Welcome to Little Bear's Cupcakery! Here we have a special treat each week and tell you how to make it for yourself!
Don't want to or don't have time to make it yourself? Check out our website, www.LittleBearsCupcakery.weebly.com to order a batch of the best cupcakes, cakes, cookies, and other yummies around.
Make sure to 'like' us on Facebook too!
Showing posts with label frosting. Show all posts

Thursday, May 10, 2012

(White) Chocolate Rain!

Gosh, life is getting so busy already this summer! Between getting my yard ready, flowers planted, work, two cats, a dog, and a hubby, I find that I hardly have time to bake right now. Like, only a couple treats a week ;) So I'm delving into the Cupcakery archives for an old favorite. Chocolate cupcakes with white chocolate cream cheese frosting and strawberry filling. Mmmmmmmmm....*drool*. Even better, this recipe works great with just about any fruit, cherries, raspberries, blueberries. Basically anything you would pair with a cheesecake :D Perfect for summer time and all of this fresh produce I have!

White chocolate cream cheese frosting and strawberry filling! Yum!


Chocolate Cupcakes
1 box chocolate cake mix (and any eggs/oil/water called for on the box)

Prepare the cake according to the directions on the box and let cool.

Strawberry Filling
1 lb fresh strawberries
1/2 C white sugar (or 1/4 C honey/agave nectar for you healthier people)
1/4 C water

OR
2 C fresh strawberry jam

Wash, dry, and hull strawberries. In a large pot on the stove on medium high heat, mash strawberries with a potato masher. Add sugar/honey/agave and water. Bring to a boil and boil for five minutes or until you reach a jelly consistency. Be careful to keep stirring otherwise the bottom will scorch. Ew.
Let cool.

White Chocolate Cream Cheese Frosting
16 oz softened cream cheese (that's two bricks)
8 oz white chocolate (melted)
2-3 C powdered sugar
1 T vanilla
Cocoa powder


In a large mixing bowl combine the softened cream cheese and melted white chocolate. Add vanilla. Clear vanilla is best as it won't alter the color of this white frosting, but regular brown vanilla is totally cool too. I like to use Madagascar or Tahitian for frostings. Slowly add the powdered sugar. The amount depends on how stiff you need the frosting. As you can see in the picture above, I kept mine fairly soft.

Put the cupcakes together:
Take the unfrosted cupcakes and poke a decent sized hole in the top, just not all the way down to the liner. Using a spoon, bag or piping bag fill the holes with the strawberry deliciousness. Now either spread the frosting on with a knife or pipe it on. I used a large round tip for these ones since the frosting was too soft to hold the edges of a star tip. I dusted mine with cocoa powder. A slice of fresh strawberry on top would be awesome too!

What's your favorite fruit to use with cakes?

Saturday, March 24, 2012

Back to the Basics: Wrapping it up

Still have your wax paper, buttercream, pastry bags, and scrapery thingy out from the last few days? Perfect! Today I have for you the last few tips that I got to play with earlier this week. They include: a leaf tip, grass tip, basket weave tip, angled star tip, and a ribbon tip. Woohoo! What a collection!

First up: the leaf tip (aka tips #67, 352 small and 352 wide)
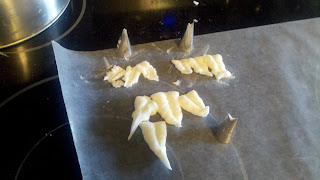
Leaf tips #67, 352 small, and 352 wide
Now that you have some tips to make some super cute flowers like hydrangeas and sunflowers, you'll need to add some leaves to those flowers! To make a leaf hold the bag at a 45 degree angle to the decorating surface. One of the 'v' tips should be touching the cake, the other should be directly above it. Start to squeeze the bag until the base of the leaf is as wide as you want it, then start slowly dragging the tip towards you. The top 'v' will make a vein through the center of the leaf. If you wiggle your hand a little as you drag the bag, you'll get a more 3D looking leaf with some character. As you get to the end of the leaf stop squeezing and pull upwards. If you want the leaf to curve, pull the bag slightly to one side or the other. Voila! A leaf!

Next, we have the grass tip (aka spaghetti tip) You'll notice this one doesn't have a number, well, it doesn't. There's really only one grass tip. It looks like a thimble.
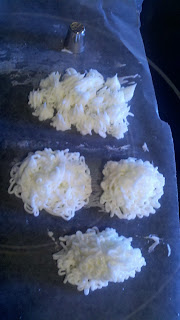
Grass tip
To make grass (perfect, by the way, for any upcoming Easter cupcakes!), hold the bag at a 90 degree angle above the decorating surface. Do not touch the surface with the tip, but rather start squeezing when you're just above it. When you have enough length, stop squeezing and pull directly up. Do lots and lots for a grassy knoll or a little hill. You'll want to even fill in holes by piping grass on top of other grass.
This tip is also perfect for spaghetti, piles of noodles, and bird nests. For spaghetti and piles of noodles, start as you did with the grass, but instead of stopping and pulling away, continue squeezing until you have a nice little pile of noodles. For a birds nest, start like you would for a cupcake swirl, but instead of swirling in, just build on top and slightly outside of the first round. TaDah! Perfect little resting spot for some robin's eggs.

Now we have: a basket weave tip (aka tip #47)
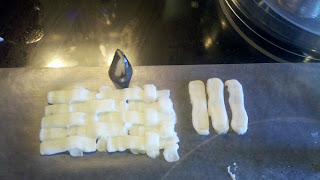
Basket weave tip #47
Perfect for some Easter baskets, or just any basket, the basket weave tip is way easier than it looks. Great for you because your friends will think you put tons of work into making the cake look so amazing, when really, it's not that hard. By the way, larger versions of this tip are great for putting down a base layer of buttercream on layer cakes.
To make a basket weave, hold the bag at a 45 degree angle to the decorating surface with the toothed edge up and the smooth edge touching the cake. Start with your vertical lines, make as many as you will need. Space between the vertical lines about the width of your frosting tip. Once you have all of your vertical lines, start with the horizontal lines, again with the toothed edge up and the smooth edge on the surface. Go over/under the vertical lines making sure to end the over lines at the next vertical line.
What a cute basket you have now!

Finally, perfect for a little girl's (or big girl's) cake: the ruffle tip (aka tip #224) Tip number 107 is very similar, but will give a more angled ruffle than the 224.
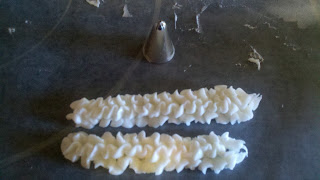
Ruffle tip #224
Whether you're simply adding a border to a cake, or a ruffle to a skirt, this tip is a great choice! To make the ruffle, hold the bag at a 45 degree angle to the cake and in front of the ruffle you are making (not above). With the tip barely touching the surface squeeze the bag and move the tip up and down (remember, use your whole arm to decorate, not just your hand!). Soon you'll have a whole stretch of princess/diva worthy ruffles!

Let me know how your practicing goes! As always, check us out on Facebook at Little Bear's Cupcakery

Friday, March 23, 2012

Back to the Basics: French Tips

Back to the basics is here again, so grab your frosting, pastry bags, wax paper and your frosting tips, it's time for some frosting fun!

Another great choice for cupcake swirls is the French tip frosting tip. You'll be able to recognize it by the many, many, many little points around the opening. Another great use for it besides swirls on cupcakes and borders on cakes though is using it to make sunflowers! It's super easy, and just like the star tip you start with the bag at 90 degrees straight up and down above where you want the flower. Make sure the tip is touching the decorating surface before you start to squeeze, and then lift directly up! The longer you squeeze, the larger and longer your petals will be.


#32, 863, and 867

The tips I used in the picture are 32, 863, and 867. Again, the triple digit numbers will need a larger weight pastry bag than the double digit numbers. Tip number 199 is a great choice too, even though it's not pictured here.

Wednesday, March 21, 2012

Back to the Basics: Writing Tips

I realized the other day that I have a tool caddy just full of pastry tips, many of which I have never used before. Now, to my credit, many are the same style of tip just different sizes, but there are several that I just flat out have never used. So what did I do with my Sunday today? Of course I spent about 2 hours whipping up a batch of basic white buttercream and playing with my frosting tips! I was in heaven. Today I have compiled a group of pictures to help you sort out which tip is best for which style of frosting you would like to achieve. Yay! A compendium of knowledge! Oh be still my nerdy little heart.
If you have a caddy full of tips, or even just want to practice with the few that you do have, it's easy and you don't even waste any frosting.

You will need:
1 batch of basic buttercream frosting
Wax paper
Pastry bags
Spatula/spreader/flat scraper thingy
Tips

Lets start out with an easy one, writing tips. I used tips #2, 3, 4, 10, and 12. As you can see, they get bigger and bigger. 
Writing tips 2, 3, 4, 10, and 12

I like #2 best for fine detail work. Just be careful that the frosting you are using is very smooth and not stiff at all. The tiny hole on this tip makes it difficult to work with stiff frosting. #3 is my favorite for writing. It's not too small, but not so big that the letters run together, great for script. #4, 10, and 12 all work really well for polka dots depending on the size of dot that you want. The three on the side there? Huge. Ginormous. They would basically make polka dots the size of a VW beetle. I'm probably never going to use them.

To write a message using one of these tips it's important to remember to keep the bag at a 45 degree angle to the cake, the tip fairly close to the surface, and to move your whole arm not just your hand. If the frosting is breaking, you are either going too fast or your frosting is too thick. If the frosting is gobbing, smooshing, or too wide, you're going too slowly. If the frosting is coming out like ribbons and is very shaky, you need to be closer to the cake.  If your tip is dragging through the letters, well, move back. You're obviously too close. Air bubbles can cause blowouts through the tip and make a mess. Use a scraper/spreader/very flat knife to pick up the oopsies and then squeeze the pastry bag to work out any air bubbles. Practice your writing on wax paper like I did with the squiggles and dots above. It just takes practice!

Ok, now here is where you find out why you won't be wasting any of this yummy yummy frosting. Take your spatula/spreader/flat scraper thingy and scrape the frosting off the wax paper (perfect to wipe out those oopsies too!) and back into your container or mixing bowl. Yay! No waste! You can totally keep this frosting for up to 2 weeks and use it on an upcoming cake.

Make sure to like us on Facebook! Little Bear's Cupcakery