Welcome to Little Bear's Cupcakery! Here we have a special treat each week and tell you how to make it for yourself!
Don't want to or don't have time to make it yourself? Check out our website, www.LittleBearsCupcakery.weebly.com to order a batch of the best cupcakes, cakes, cookies, and other yummies around.
Make sure to 'like' us on Facebook too!
Showing posts with label buttercream. Show all posts

Tuesday, November 6, 2012

Fondant or Buttercream?

It's definitely a question that bakers all over fight over. While each medium has its benefits both have definite drawbacks too. Personally, as far as eating cake goes, I prefer buttercream 10 times out of 10. To me, fondant tastes like a cross between flavorless bubble gum and those little orange circus peanuts and I peel it off the cake. Not exactly what I want to eat. Both fondant and buttercream can be flavored though, but the texture really does stay the same. For sculpting, fondant wins hands down. Making detailed 3D figures is truly what fondant/gumpaste is made for. They hold up well, are easy to mold, and work well as smaller accent pieces.

Let's compare the taste issue by looking at what exactly goes into each one:
Fondant: glucose (corn syrup), powdered sugar, and water.
Gumpaste: glucose (corn syrup), powdered sugar, gumtex, and water.
Buttercream: butter, shortening, cream, and powdered sugar.

You can see why the fondant and gumpaste alone wouldn't have a great taste. Adding extracts (vanilla, almond, lemon, etc.) can greatly improve that issue. The texture though is inherent to the medium, just no changing that. Buttercream too can be a bit plain without extracts, maybe a little too sweet, but there's no beating the texture of a silky smooth frosting.

Each baker has their own style and will prefer to work with a specific medium, whether it's fondant, buttercream, or even those crazy Europeans and their marzipan, but a great baker will know when to make use of or limit each to best highlight the flavor of the cake, as well as the taste of the consumer. Cause some crazy people actually like the taste of fondant.

As you can see, buttercream frosting with a fondant ACCENT piece. :D Still yummy

Wednesday, June 6, 2012

So Long, Farewell!

We recently had a coworker retire, so of course I made a cake for the party on his last day. Now this gentleman used to live in Nebraska and is a big fan of the Nebraska Cornhuskers (I know, I know, there's no accounting for taste sometimes). Fittingly I made him a cake in the shape of the iconic Nebraska 'N'. I made sure to take pictures along the way, because I figured this would be a great opportunity to showcase a carved cake.
The Husker-tastic finished product!
To do this cake I baked two 9 inch square cakes, let them cool overnight, took them out of the pans and placed them on my decorating turntable with some wax paper to keep the display plate clean. I printed off an 'N' that I found online, copied into a word document, and measured out to just under the 9 inch cake size. I trimmed the 'N' and filled and stacked the cakes. (Vanilla custard buttercream filling recipe to come another day!) After positioning the cut out on the cake I took a sharp serrated knife and cut through the cake while holding on to the paper with the other hand. And I still have all of my fingers! Woohoo!
Hint: keep those cake scraps to make cake balls/pops, or to fill in any holes should you have a cake disaster.

Ready to carve
Once it was carved I cleaned up any excess crumblies and applied a crumb coat of regular white buttercream frosting. This step is important because it traps any crumbs so they won't show up on the final frosting layer. See how it still looks like that 'N'? I was so excited.

Lookin' good!
After the crumb coat the cake went into the fridge for half an hour to set the frosting. Once those crumbs weren't going anywhere I put another thin layer of white buttercream frosting on, which I then airbrushed a lovely Husker red. To get that buttercream extra smooth, run your spreader under hot water for a few seconds, then dry it off. Smooth the frosting with the hot spreader, making sure to clean the edge frequently.

And look at that clean display plate!
When it was done I (carefully) pulled the wax paper out after running my spreader between the cake and the paper to loosen it. I wasn't too worried about smudging the bottom because the bottom border hides that. All that was left was to pipe on the white border using a round tip, and write on the message! Lots of ooohs and ahhhhs at work that day!

Saturday, March 24, 2012

Back to the Basics: Wrapping it up

Still have your wax paper, buttercream, pastry bags, and scrapery thingy out from the last few days? Perfect! Today I have for you the last few tips that I got to play with earlier this week. They include: a leaf tip, grass tip, basket weave tip, angled star tip, and a ribbon tip. Woohoo! What a collection!

First up: the leaf tip (aka tips #67, 352 small and 352 wide)
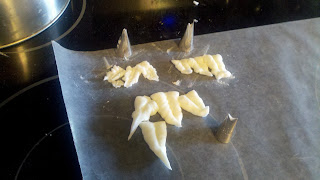
Leaf tips #67, 352 small, and 352 wide
Now that you have some tips to make some super cute flowers like hydrangeas and sunflowers, you'll need to add some leaves to those flowers! To make a leaf hold the bag at a 45 degree angle to the decorating surface. One of the 'v' tips should be touching the cake, the other should be directly above it. Start to squeeze the bag until the base of the leaf is as wide as you want it, then start slowly dragging the tip towards you. The top 'v' will make a vein through the center of the leaf. If you wiggle your hand a little as you drag the bag, you'll get a more 3D looking leaf with some character. As you get to the end of the leaf stop squeezing and pull upwards. If you want the leaf to curve, pull the bag slightly to one side or the other. Voila! A leaf!

Next, we have the grass tip (aka spaghetti tip) You'll notice this one doesn't have a number, well, it doesn't. There's really only one grass tip. It looks like a thimble.
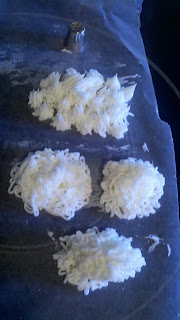
Grass tip
To make grass (perfect, by the way, for any upcoming Easter cupcakes!), hold the bag at a 90 degree angle above the decorating surface. Do not touch the surface with the tip, but rather start squeezing when you're just above it. When you have enough length, stop squeezing and pull directly up. Do lots and lots for a grassy knoll or a little hill. You'll want to even fill in holes by piping grass on top of other grass.
This tip is also perfect for spaghetti, piles of noodles, and bird nests. For spaghetti and piles of noodles, start as you did with the grass, but instead of stopping and pulling away, continue squeezing until you have a nice little pile of noodles. For a birds nest, start like you would for a cupcake swirl, but instead of swirling in, just build on top and slightly outside of the first round. TaDah! Perfect little resting spot for some robin's eggs.

Now we have: a basket weave tip (aka tip #47)
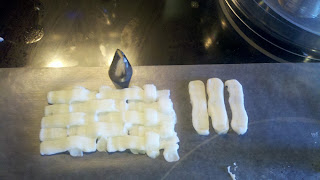
Basket weave tip #47
Perfect for some Easter baskets, or just any basket, the basket weave tip is way easier than it looks. Great for you because your friends will think you put tons of work into making the cake look so amazing, when really, it's not that hard. By the way, larger versions of this tip are great for putting down a base layer of buttercream on layer cakes.
To make a basket weave, hold the bag at a 45 degree angle to the decorating surface with the toothed edge up and the smooth edge touching the cake. Start with your vertical lines, make as many as you will need. Space between the vertical lines about the width of your frosting tip. Once you have all of your vertical lines, start with the horizontal lines, again with the toothed edge up and the smooth edge on the surface. Go over/under the vertical lines making sure to end the over lines at the next vertical line.
What a cute basket you have now!

Finally, perfect for a little girl's (or big girl's) cake: the ruffle tip (aka tip #224) Tip number 107 is very similar, but will give a more angled ruffle than the 224.
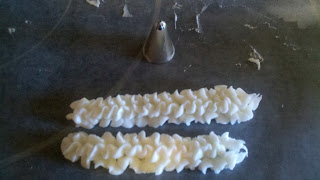
Ruffle tip #224
Whether you're simply adding a border to a cake, or a ruffle to a skirt, this tip is a great choice! To make the ruffle, hold the bag at a 45 degree angle to the cake and in front of the ruffle you are making (not above). With the tip barely touching the surface squeeze the bag and move the tip up and down (remember, use your whole arm to decorate, not just your hand!). Soon you'll have a whole stretch of princess/diva worthy ruffles!

Let me know how your practicing goes! As always, check us out on Facebook at Little Bear's Cupcakery

Friday, March 23, 2012

Back to the Basics: French Tips

Back to the basics is here again, so grab your frosting, pastry bags, wax paper and your frosting tips, it's time for some frosting fun!

Another great choice for cupcake swirls is the French tip frosting tip. You'll be able to recognize it by the many, many, many little points around the opening. Another great use for it besides swirls on cupcakes and borders on cakes though is using it to make sunflowers! It's super easy, and just like the star tip you start with the bag at 90 degrees straight up and down above where you want the flower. Make sure the tip is touching the decorating surface before you start to squeeze, and then lift directly up! The longer you squeeze, the larger and longer your petals will be.


#32, 863, and 867

The tips I used in the picture are 32, 863, and 867. Again, the triple digit numbers will need a larger weight pastry bag than the double digit numbers. Tip number 199 is a great choice too, even though it's not pictured here.