Welcome to Little Bear's Cupcakery! Here we have a special treat each week and tell you how to make it for yourself!
Don't want to or don't have time to make it yourself? Check out our website, www.LittleBearsCupcakery.weebly.com to order a batch of the best cupcakes, cakes, cookies, and other yummies around.
Make sure to 'like' us on Facebook too!

Tuesday, November 6, 2012

Fondant or Buttercream?

It's definitely a question that bakers all over fight over. While each medium has its benefits both have definite drawbacks too. Personally, as far as eating cake goes, I prefer buttercream 10 times out of 10. To me, fondant tastes like a cross between flavorless bubble gum and those little orange circus peanuts and I peel it off the cake. Not exactly what I want to eat. Both fondant and buttercream can be flavored though, but the texture really does stay the same. For sculpting, fondant wins hands down. Making detailed 3D figures is truly what fondant/gumpaste is made for. They hold up well, are easy to mold, and work well as smaller accent pieces.

Let's compare the taste issue by looking at what exactly goes into each one:
Fondant: glucose (corn syrup), powdered sugar, and water.
Gumpaste: glucose (corn syrup), powdered sugar, gumtex, and water.
Buttercream: butter, shortening, cream, and powdered sugar.

You can see why the fondant and gumpaste alone wouldn't have a great taste. Adding extracts (vanilla, almond, lemon, etc.) can greatly improve that issue. The texture though is inherent to the medium, just no changing that. Buttercream too can be a bit plain without extracts, maybe a little too sweet, but there's no beating the texture of a silky smooth frosting.

Each baker has their own style and will prefer to work with a specific medium, whether it's fondant, buttercream, or even those crazy Europeans and their marzipan, but a great baker will know when to make use of or limit each to best highlight the flavor of the cake, as well as the taste of the consumer. Cause some crazy people actually like the taste of fondant.

As you can see, buttercream frosting with a fondant ACCENT piece. :D Still yummy

Wednesday, September 26, 2012

I "Mustache" You a Question

How do you feel about the current mustache craze? It's not as overtly delicious as the bacon craze (mmmm...bacon) but there are definitely ways to make mustaches edible!

A Cupcakery customer recently had a 'daddy shower' for her husband and his friends and she requested a number of masculine cookies including mustaches on a stick! I found the cookie cutter at Cheap Cookie Cutters (where they have thousands of fabulous cookie cutters!) and even though it was smaller than I thought it would be they turned out really well.

I made a batch of my sugar cookies, recipe here, and before they went in the oven I added a small lollipop stick. I gently pushed them into the back (not all the way through) and added a little extra dough over the back of the stick. Five minutes in the oven and the sticks stayed in! Because of the extra dough on the back I had to decorate what was the back of the cookie with brown, black, and gray royal icing. YUM!

Note: if the stick starts to slide out, take it out, dip the end in a little royal icing and gently slide it back in. Royal icing is an awesome 'glue' to fix mistakes and oopsies since it dries so hard.

Tuesday, September 4, 2012

I Have "Fall"-en in Love with this Muffin!

Fall is my favorite season, or would be if it didn't mean that winter and snow were coming... But I try to enjoy the crispy cool nights, changing colors, and delightful flavors regardless of the impending frigid weather. Some of my favorite fall flavors are maple, nuts, and chocolate, so why not combine those flavors into one delicious muffin?! Thanks to my bestie who made cookies with these ingredients! You go MO! These are wonderful with a little melted butter on top, a streusel topping, or even just cinnamon sugar!


Maple Walnut White Chocolate Chip Muffins
2 C flour
3 1/4 t baking powder
1/4 t salt
1/2 C sugar
1/2 t cinnamon
2 eggs
1/2 C melted butter
1/2 C maple syrup
1 C white chocolate chips
1 C chopped walnuts

Preheat oven to 400. Combine all dry ingredients in a large mixing bowl. Create a well in the center and add eggs, melted butter and syrup. Stir until just combined and add chips and nuts. Spoon into a papered muffin tin (about 3 T per paper) and bake for about 18-20 minutes.

Wednesday, August 22, 2012

If Life Hands You Flat Cookies, Make Cookie Bites!

Do your cookies ever turn out looking like this? Well, it's not your oven, it's you.
Oh, sad cookie :(

Don't be ashamed, it happens to all of us. It even happened to me last week. (GASP! I know!) I was in a hurry and didn't let the butter come all the way to room temperature. That resulted in butter that wouldn't cream with the sugar. This is a super necessary step because the sugar crystals are cutting holes into the butter and those holes are what fill up with gases made by the baking powder/soda, which gives cookies their lift. Cold butter = no holes = flat cookies. Sad day. Even sadder is that there really isn't a fix that you can go back and do after the fact.
But wait! Don't throw all that dough into the trash! (or eat it all raw) Make cookie dough bites! You know, like those ones you can buy at the store? But these are even better because you can make them as big as you want!

What you need:
Cookie dough (I like using chocolate chip cookie dough)
1 pound (at least) Chocolate (the good stuff, none of that quik candy)
Double boiler
Candy thermometer


You're going to get a quick lesson on tempering chocolate. Tempering is an important step in the candy making process and if you skip it or do it improperly it will result in dull, streaky, chalky, or crystallized chocolate. Lucky for us it's pretty easy if you have the right tools! (I have a tempering unit, but if I'm doing lots of chocolate I use the stove method).
My tempering unit, it's idiot proof!

1. Simmer water (not boiling) in a saucepan and place 2/3 of your chocolate in the double boiler. Attach your candy thermometer and get to stirring with a rubber spatula (not a metal/wood spoon).
2. You want dark chocolate to reach 115 degrees and milk/white chocolate to reach 110 degrees, and NO HIGHER! Once it hits that temperature (and you've been stirring all this time, right?), remove the double boiler, wipe off the bottom and set it on a heat proof surface.
3. Add the remaining 1/3 of your chocolate. Stir it in. The residual heat will melt most if not all of this. If you have any chunks left over once it cools to 84 degrees you can just remove them.
4. Replace the bowl over the saucepan until the chocolate reaches 89 (dark) or 87 (milk/white). Do not let it go over 91.
Yay! You have tempered chocolate! This chocolate will make a shiny candy with a great 'snap'. Keep it warm while you are working with it (86 for milk/white, and 88 for dark).
These are about 1 1/2 T sized
Now that you have tempered chocolate, form little balls of cookie dough and refrigerate. Dip the firm balls of dough into the chocolate. With the hand that is not holding the dipping utensil, tap the wrist of the hand that is holding it to shake off the excess chocolate. Place the dipped cookie dough on wax paper or a SilPat mat and let cool.
Dark chocolate covered cookie dough bites!

Mmmmmm! No more wasted cookie dough, ever!

Wednesday, August 15, 2012

Did You Know?

Did you know you can freeze cake? It freezes really well actually, sheet cakes, cupcakes, cake balls, even cake crumbs. And you know what else? Those big box grocery stores do it all the time. In fact, a cake made in your own house and frozen for a week or two is probably going to be fresher than those you get from the store. Frosted or unfrosted, it really doesn't make a difference. Did you make a whole batch of cupcakes and only needed half? Freeze the rest. Really. They defrost in about 30 minutes, which coincidentally is about the time it takes to whip up a batch of frosting, ice them, and get them to where they're going. Bingo, ready made cupcakes, you're now everyone's favorite person.
You know what else I have frozen? Cookie dough. I usually have logs of cookie dough in the freezer, ready to cut off a few for when those unexpected people show up. (Perfect since my cookie recipe takes up to 48 hours!!!) And you know what? Those big box stores get those in frozen too, and they can sit for weeks to months in the freezers there. How do I know this? I worked there. Don't get me wrong, those grocery store goodies taste darn good, but not quite the same as customizing them to your personal taste and getting them fresh from the oven.
Plus, you know exactly what went into your goodies, who touched them, and how long ago they were made. That's a win in my book over the grocery stores any day! So if you're one of those super people who take a day to cook for the whole week, try baking some goodies ahead too. I swear they keep in the freezer just fine for up to month! Perfect for the average busy family with no time whip up a batch of something every time one of the kids/husband/neighbor needs something.

Thursday, August 2, 2012

Is It a Cupcake, Or a Cake? Both!

I love cupcake cakes. They combine the best of both worlds, like the easy single serve-ability from the cupcakes and a large decorating surface like a sheet cake. You can arrange the cupcakes into a super cute shape (like this golf course cupcake cake) or just as a sheet like I did with this Bronco's cake. All you need is a dozen cupcakes (or more, depending on what you want to arrange or how many you're feeding) of your favorite flavor, a batch of buttercream frosting, and some food coloring! Yay!
Find a board and cover it in foil, or go to WalMart and get yourself one of those cake boards. Before decorating, lay out the cupcakes in the design you want. This is the time to move them around, before they're 'glued' down. Once you have the design down, dab some frosting on the bottom of each cupcake liner and use that to 'glue' the cupcake to the board. Slap a generous amount of frosting on top of the cupcakes and start spreading it smooth. Pipe a border with a large star tip and voila! You have a blank slate for a cupcake cake!
No plates necessary!

For this Bronco's birthday cake I did the above, but before piping on the border I airbrushed the surface a lovely Bronco's blue and hand drew on the Bronco's logo. I outlined the horse in black and filled in with the white and orange. After piping on the celebratory well wishes, the border went on, along with some confetti sprinkles, and bingo! a fabulous cake!

Wednesday, July 11, 2012

Not Just for S'mores Anymore!

Let me just put this out there, I'm a buttercream frosting kind of girl. To me there's nothing better than a big ol' corner piece of cake, other than maybe a corner piece of cake with ice cream! I personally don't like the taste of fondant but I have to admit, it does make a beautiful end product. I mean, what's the point of eating a cake if there's no frosting and you just pull off the fondant?! But, sometimes you just have to use fondant and when that time comes, there's marshmallow fondant. Yep, fondant made out of marshmallows. I swear, it really does taste like marshmallows (but it does still have the same texture as other fondants for those of you with texture issues). While it tastes way better than regular fondant, it melts a little bit more easily so it's not quite as versatile but great for indoor parties!

Fondant TP roll 1st anniversary cake

Marshmallow Fondant
8 oz mini marshmallows (if you plan on coloring the fondant, get similar colored marshmallows)
1 lb (4 C) powdered sugar, plus extra for dusting
2 T water
Flavors/extracts/colors (vanilla, lemon, chocolate, peanut butter, etc)

In a large microwave safe bowl melt the marshmallows for about 1 minute. Stir with a silicone spatula until all the little 'mallows are melted. Add the flavors/extracts/colors at this point if you are only making one color or flavor for this batch, otherwise add those after the powdered sugar.

Add the powdered sugar 1 C at a time and carefully stir it in. Continue to add sugar until it won't take anymore. Scrape the mixture out on to a work surface that has been very much covered/dusted with powdered sugar. Dust your hands with sugar too, and start kneading that sticky mess of marshmallows with the rest of the sugar that wouldn't stir in. Continue to knead until the fondant is smooth, elastic, and not super sticky. Too much sugar here will make the fondant stiff and difficult to work with.

*If you are making multiple batches of flavors/colors, split up the fondant and shape each one into a disk. You'll knead the flavors and colors in with your hands so gloves would be a great idea at this point. Add the extracts/colors to the center of the disk and fold the fondant in on itself. Knead the fondant until the colors are completely incorporated and no longer streaky.

To use right away roll it out on a powdered sugar covered surface. To store for later wrap tightly with plastic cling wrap and keep in the fridge. You'll need to microwave it for 10-15 seconds and knead it a bit before rolling it out after you take it out of the fridge.

Once it's rolled out, roll it on to the rolling pin and unroll over your cake that has been crumb coated (and the crumb coat should have 'crusted' by now). Smooth the fondant on with your hands starting from the top down smoothing out any pleats and wrinkles as you go and pressing it lightly into the cake. Cut the extra off of the bottom (I use a sharp pizza wheel cutter). Get out your plastic fondant smoother and go back over the fondant to take out any leftover fingerprints and wrinkles. Cut off any excess fondant. I stick mine in the fridge at this point to firm the crumb coat and make sure it sticks to the fondant.

At this point you cant decorate the rest with buttercream (YUM) or other fondant decorations. There are tons of little tools to make flowers and molds to make borders that will make your cake stand out!

Friday, July 6, 2012

Fresh and Sweet

Summer is the perfect time to bake with fresh fruit. I made a delicious fresh strawberry pie for the 4th of July along with some cookies, of course. Now, if only I could have one of you send me some of the fresh berries from Mary's Berries I think that's the only way this pie could be any better!
This recipe is a three part-er, the crust, the 'filling', and the glaze.

Doesn't that look pretty-ful?


One Crust Pie Pastry
2/3 C shortening
1/4 C butter (cold, cut into pats)
1/2 t salt
2 1/2 C Flour
1/4-1/3 C ice cold water

In a mixer, sift in the flour, add the salt, add the shortening and turn on to low. Add the butter one cold pat at a time (make sure it's cold! Have I said that enough?!) Once the dough looks like a crumbly mess add the water 1 Tablespoon at a time. You'll have enough water when you can reach in and squeeze the dough and it holds together but isn't sticky. Roll the dough into a ball, wrap in plastic wrap and refrigerate for at least 1 hour. Before rolling out, let it come to room temp for about 15 minutes. I like to roll mine out on a silpat mat, but any floured surface will do. When you roll it out, aim for about 1/4 inch thick. To get it into the pan easier, roll the dough onto your rolling pin, and unroll into your floured pie pan. Fix the edges how you like them, I like to roll the tops in and seal with a fork. Now, put it back in the fridge for 30 minutes. Super important here before you blind bake a pie crust (that's baking without filling). Preheat the oven to 350, prick the bottom of the dough with a fork to let out the steam, cover the edges with foil and bake for 8 minutes. Take the foil off and bake for another 12. Let the crust cool completely.

Strawberry Pie 'Filling'
8 C washed, hulled, and sliced in half berries
1/2 C Nutella or sweetened cream cheese

On the cooled pie crust, spread the Nutella or cream cheese over the bottom. Arrange the strawberries in a pretty circle. Refrigerate. Done.

Strawberry Pie Glaze
1 1/2 C strawberries, washed and hulled (these can be the ugly ones that weren't good enough to go in the pie)
1/2 C water
1/2 C sugar
2 T cornstarch

In a blender combine the berries and water. On the stove stir together the sugar and cornstarch, pour in the water/berries mix. Heat on medium until bubbly (not boiling) and thick. Remove from heat for 10 minutes and do NOT stir while it's cooling. Feel free to stir while it's cooking though.
Just before serving pour or brush the glaze over the pie. Do not do this more than 3 hours before serving or you'll have a mushy mess. And if you have left over glaze it's basically strawberry jelly. YUM! Super delicious on toast.

Wednesday, June 27, 2012

Time to Cool Down

Better than ice cream? Not really, but it's a great substitute when you've already had your ice cream allowance for the week (Nobody else gets that? Must just be me then...). I first saw frozen hot chocolate on Food Network when they went to Serendipity 3 in New York. Since then I've tried it at DQ, but at $4 a pop, I knew I could make it myself for cheaper so I went on a frozen hot chocolate spree trying to make a copycat recipe. I made a recipe, with help from Big Bear's momma's hot cocoa recipe, that I think is pretty darn close. The best part of this is that you can keep the cocoa mix year round, have frozen in the summer and hot in the winter. Or however you want to do it, I'm not telling you how to drink your cocoa.
Mmmmm chocolate-y

Frozen Hot Chocolate (Makes one drink)
6 T cocoa mix (recipe below)
1 C ice
1 C milk
Whipped Cream
Cherry
Chocolate chips or shavings

In a blender (one that can crush ice), mix the milk and cocoa mix until well combined. Add ice and blend until crushed, it should be the consistency of a frozen margarita or a slushy. Pour into a a large cup, top with whipped cream, a cherry, and chocolate chips or shavings. Drive past the DQ and laugh at everyone in line waiting to get their frozen hot chocolate. (Last part is optional!)

Cocoa Mix
2 C powdered sugar
1 C cocoa (I like Hershey's Dark)
2 1/2 C dry creamer
1 t salt

In a mixing bowl combine all the ingredients and store in an airtight container.


Pictures are coming once Big Bear gets home and gets his FroCho!

Wednesday, June 20, 2012

Cinnamon Roll Deliciousness

Mmmmm, what's better than a plate full of warm cinnamon rolls in the morning? Probably waking up to the smell of warm cinnamon rolls :D But since I'm the little bakeress in this house my hubs gets to experience that one. The best thing about this recipe though is that you can freeze the rolls before letting them rise and pull out 1-2 whenever you want a couple! Yay for not having to do the whole batch at once!
I chose to do them in the muffin pan, individual servings!

Cinnamon Rolls
Dough
3/4 C buttermilk, warm (110 degrees)
6 T unsalted butter, melted and cooled
3 eggs
4 1/4 C all-purpose flour, reserve 1/4 C
1/4 C sugar
1 envelope instant or rapid-rise yeast

1 1/4 t salt
Filling 
3/4 C packed light brown sugar
1/4 C ground cinnamon
Pinch of salt
1 T unsalted butter, melted and cooled

Frosting
1 C softened butter
10 oz softened cream cheese
2 oz vegetable shortening
1 1/2 lbs powdered sugar
2 T heavy cream
2 t vanilla
1 T meringue powder


For the dough:
Whisk the buttermilk, melted butter, and eggs together in a large separate bowl. Combine 4 cups of the flour, sugar, yeast, and salt together in a mixer with the dough hook. With the mixer on low speed, add the buttermilk mixture and mix about 2 minutes. Increase the mixer speed to medium and knead until the dough is smooth and elastic, about 10 minutes. If after 5 minutes more flour is needed, add the remaining 1/4 cup flour, 1 tablespoon at a time, until the dough clears the side of the bowl but sticks to the bottom.
Turn the dough out onto a lightly oiled counter (I use cooking spray, easy!) with plenty of room and knead by hand to form a smooth, round ball. Place the dough in a lightly oiled bowl and wrap tightly with plastic wrap. Let rise in a warm place until doubled in size, 2 to 2 1/2 hours.

For the filling:
Grease a 9 x 13 pan or a jumbo muffin pan if you are doing just a few. Mix the brown sugar, cinnamon, and salt together in a small bowl. Turn the risen dough out onto a lightly floured counter and press/roll it into a 16 by 12-inch rectangle. Brush the dough with the melted butter, then sprinkle the brown sugar mixture over it, leaving a  1 inch border along the top edge. Press on the filling to ctick it to the dough.
Loosen the dough from the counter using a bench scraper, metal spatula, or any other instrument with a large flat edge, and roll the dough into a tight log. Pinch the seam closed and roll the log seam side down. Gently stretch the log to 18 inches in length with an even diameter and pat the ends to even them.
Slice the log into 12 evenly sized rolls (about 1 1/2 inches wide) using a serrated knife. Arrange the rolls in the prepared baking pan and wrap tightly with greased plastic wrap, or place a few in the oiled muffin pan and cover. If you want to freeze them, stop at this point and don't let them rise! Freeze them in whatever pan they're in, covered in heavy duty foil. Otherwise, let rise in a warm place until the rolls have nearly doubled in size and are pressed against one another, 1 to 1 1/2 hours. Adjust an oven rack to the middle and heat the oven to 350. Bake the rolls until golden and puffed, 25 to 30 minutes if you are using the 9 x 13 pan. Bake 20 to 25 minutes if using the muffin pan. Flip the rolls out onto a wire rack set over a sheet of parchment paper (for easy cleanup) and let cool for 5 minutes.

For the frosting:
In a mixer combine the butter, cream cheese, and shortening. Add the powdered sugar slowly, 1 cup at a time. Once the sugar is fully incorporated, add the vanilla, meringue powder, and cream. Beat on high for about 3 minutes. Stop, scrape down the sides and beat for an additional 2 minutes. This will make about 2 1/2 times the amount of frosting for one batch of 12 rolls. The frosting will keep about 2 weeks in the fridge and 2 months in the freezer.

Once the rolls are mostly cool, but still warm enough to slightly melt the frosting, spread the frosting over the rolls and delight anybody lucky enough to be waking up in your house that day.

"I wish they made a cinnamon roll incense because I don't always have time to make a pan. Perhaps I'd rather light a stick and then have my roommates wake up with false hopes" -Mitch Hedberg

Monday, June 18, 2012

Well Lookee Here

For those of you not on The Cupcakery's Facebook page (which you can get to here), we have great news! Little Bear's Cupcakery is now online and ready to accept orders for fabulous and delicious treats! Come on over to www.LittleBearsCupcakery.weebly.com to see what we have to offer. At this time we cannot ship cakes or cupcakes, but there are still plenty of options for you non-Sheridan area fans! So head on over, check us out, and get your favorite homemade goodies!

Wednesday, June 13, 2012

'Merica, Heck Yeah!

I'm sure by now you've all heard of cake balls and cake pops. Bakerella made these trendy within the last couple of years. I've found that they are a great way to use up extra cake scraps (like the ones from last week's Nebraska cake). They're like a  mix between a truffle and a piece of cake, they're moist, bite sized, and delicious. Even better though, they're customizable to whatever your theme might be! As you can see with these cake balls, I colored and decorated them to reflect Flag Day tomorrow.
Flag balls!

Cake Balls
Cake scraps, or a baked/cooled cake, crumbled into very fine pieces
2-4 T buttercream frosting
Almond bark/chocolate melting wafers (NOT chocolate chips)
Decorations: food coloring/sprinkles/melted chocolate etc.

Start with a large bowl of finely crumbled cake. Add the frosting 1 tablespoon at a time, working it into the cake as you go. Too much frosting will result in mushy cake balls, too little and the cake balls won't hold together. Once the cake will hold a ball shape you've got enough frosting! If you aren't going to be serving these right away (withing 48 hours), err on the side of too little frosting. They will definitely get more moist as they sit.
Chocolate cake scraps and white buttercream

I used a cookie scooper to form equal sized balls. Place them on a lined cookie sheet and pop them in the fridge for up to 30 minutes. This allows the frosting solidify a little bit and hold the cake together. While the balls are in the fridge melt the candy coating in the microwave in 30 second increments. You'll want to use a fairly deep dish to dip the balls. If you add food coloring to the candy coating please read the instructions for doing so. Most liquid/gel food colorings will change the consistency of the candy coatings making it necessary to add shortening to the melted chocolate. If possible, use powdered coloring.
Formed cake balls ready for the fridge

Using a spoon, or a candy dipping fork if you have it, and lightly coat the cake balls with the candy coating. Tap the spoon or fork on the side of the dish to take off excess candy and deposit the ball back on to the lined cookie sheet. Work as quickly as you can to keep the balls from warming up too much. If need be, only take a few out of the fridge at a time. Once they are coated, do not store them in the fridge. This will cause them to "sweat". Once they are dry arrange them prettily on a tray/plate and enjoy!
As always, check us out on Facebook! Tell us about your favorite red, white, and blue desserts!

Wednesday, June 6, 2012

So Long, Farewell!

We recently had a coworker retire, so of course I made a cake for the party on his last day. Now this gentleman used to live in Nebraska and is a big fan of the Nebraska Cornhuskers (I know, I know, there's no accounting for taste sometimes). Fittingly I made him a cake in the shape of the iconic Nebraska 'N'. I made sure to take pictures along the way, because I figured this would be a great opportunity to showcase a carved cake.
The Husker-tastic finished product!
To do this cake I baked two 9 inch square cakes, let them cool overnight, took them out of the pans and placed them on my decorating turntable with some wax paper to keep the display plate clean. I printed off an 'N' that I found online, copied into a word document, and measured out to just under the 9 inch cake size. I trimmed the 'N' and filled and stacked the cakes. (Vanilla custard buttercream filling recipe to come another day!) After positioning the cut out on the cake I took a sharp serrated knife and cut through the cake while holding on to the paper with the other hand. And I still have all of my fingers! Woohoo!
Hint: keep those cake scraps to make cake balls/pops, or to fill in any holes should you have a cake disaster.

Ready to carve
Once it was carved I cleaned up any excess crumblies and applied a crumb coat of regular white buttercream frosting. This step is important because it traps any crumbs so they won't show up on the final frosting layer. See how it still looks like that 'N'? I was so excited.

Lookin' good!
After the crumb coat the cake went into the fridge for half an hour to set the frosting. Once those crumbs weren't going anywhere I put another thin layer of white buttercream frosting on, which I then airbrushed a lovely Husker red. To get that buttercream extra smooth, run your spreader under hot water for a few seconds, then dry it off. Smooth the frosting with the hot spreader, making sure to clean the edge frequently.

And look at that clean display plate!
When it was done I (carefully) pulled the wax paper out after running my spreader between the cake and the paper to loosen it. I wasn't too worried about smudging the bottom because the bottom border hides that. All that was left was to pipe on the white border using a round tip, and write on the message! Lots of ooohs and ahhhhs at work that day!

Thursday, May 31, 2012

The Best Chocolate Chip Cookie Ever?

It's a question still because they're not done yet :( that has been answered! I have been searching for a while for a new and improved chocolate chip cookie recipe. A few months ago I found Cheryl's blog with what she is claiming to be the 'BEST chocolate chip cookie recipe'. We'll see. I'm just a little skeptical, you know, because I have been using variations on the Tollhouse recipe for years. I always thought my cookies were pretty darn good, but that was just maybe because in this day and age any homemade cookie is special when compared to the influx of store bought goodies gracing our tables. So today I am trying this recipe. It is not for the faint of heart as it is quite involved and you apparently must be precise. I'm so not that way with baking. I toss, add, dash, pinch, and guesstimate to my little heart's content. But that's probably why my cookies are never consistent, and therefore why I was hunting for a new recipe! This recipe needs about 24-36 hours to prepare (not constantly, that includes chill time, relax), so it's totally not for those last minute bake sales.
They're as big as my hand!

UPDATE: These cookies are the shiz-nit. I used to work at a grocery store bakery and these remind me of the 'jumbo' cookies we sold there. But homemade. I wish I could give you all samples through the computer, because you would totally be running out to buy cake and bread flour right now (or putting in your orders to me). My only regret is not making a double batch because these suckers will be gone in no time since it makes 18 cookies.

The Goods
2 cups minus 2 tablespoons (8 1/2 ounces) cake flour
1 2/3 cups (8 1/2 ounces) bread flour
1 1/4 teaspoons baking soda
1 1/2 teaspoons baking powder
1 1/2 teaspoons salt
2 1/2 sticks (1 1/4 cups) unsalted butter
1 1/4 cups (10 ounces) light brown sugar
1 cup plus 2 tablespoons (8 ounces) granulated sugar
2 large eggs
2 teaspoons vanilla extract
1 1/4 pounds chocolate chips

Notice how there are weights listed here? Yeah, like I said, precision is key with this recipe. Turns out, dry goods should really be weighed, not measured, for a consistent outcome. I mean, it makes sense. Am I the only one who was ever confused by brown sugar packing instructions? Lightly/loosely/densely/firmly pack the brown sugar. Totally subjective. But 10 oz is the same no  matter where you go. One other note before you start, the quality of your ingredients affects the outcome just as much as the consistency in measurement. A better vanilla and great chocolate chips will taste different than artificial extracts or bargain brands. Just sayin'.

The Instructions
  1. Sift both flours, baking soda, baking powder and salt into a bowl. Set aside.
  2. Using a mixer fitted with paddle attachment, cream butter and sugars together until very light in color and consistency. You may need to scrape down the sides once or twice during this step. I love my KitchenAid, we've been through a lot together, but it doesn't quite reach the bottom. Add eggs, one at a time, mixing well after each addition. Stir in the vanilla. Reduce speed to low (or you'll make a giant mess like I did), add dry ingredients and mix until just combined. Drop chocolate pieces in and incorporate them gently without breaking them. Press plastic wrap against dough and refrigerate for 24 to 36 hours. Cheryl tells us that the dough may be used in batches, and can be refrigerated for up to 72 hours. I think if it stayed longer than the 24 hours called for in the recipe the hubs would be eating it out of the bowl.


See, looks yummy so far!

3. Preheat your oven to 350 degrees. I used both cheap-o cookie sheets and my fancy schmancy ones. I didn't use parchment or SilPat mats on either. And you know what? They turned out just fine. Weigh out the dough to 3.5 oz balls. They will look ginormous, bigger than golf balls. 3 oz would be totally cool too, just decrease the cooking time by a few minutes.
See the spoon for comparison on size. Huge.

4. I baked three cookies at a time on my cookie sheets for 19  minutes each. Start at 18 and go up from there, this totally depends on your oven and how true your temps are.
Put the others in the fridge while some are baking

5. Super important here! After they are done in the oven, pull out the pans and let them rest on the pans for 10 minutes!!!!! I can't put enough exclamation points to tell you how crucial this is. I didn't do this with the first cookie and it literally disintegrated. Sad day. Not really, I got to eat that one :) After ten minutes, transfer the cookies to a wire cooling rack. Let them cool until you can't stand it anymore and nom away. 

Wednesday, May 23, 2012

Oreo Heaven

I think my favorite flavor combination is probably cookies and cream. Whether it's ice cream or these cupcakes I did today, nothing can really beat it. Plus, there's so many different possibilities of flavors depending on what cookie you use! Today I used chocolate cream filled chocolate cookies. Yummy! Again, these cupcakes seem gourmet but take very little effort.

Cookies and Cream Cupcakes
1 box white cake mix (any eggs/water/oil called for on the box)
1 package Oreos of your choice (I used chocolate cream)

See how easy that sounds?!

Mix the cake mix as called for on the box. Preheat your oven according to the instructions on your cake mix. Line 24 cupcake tins with paper liners and place one Oreo cookie in the bottom of each liner.

Crumble the remaining Oreos from the package (I always have six left, no snacking!) into the cupcake batter. Spoon about 2T of batter into each liner on top of the whole Oreo.

Bake for about 20-22 minutes. This is longer than I normally go for, but the cupcake liners are more full with the Oreo in the bottom, and will take longer this way.
Let them cool completely and frost with your choice of white or chocolate buttercream, or even cream cheese frosting.
I didn't have extra cookies for a garnish, but if you save a couple you can crush them into crumbs and sprinkle the crumbs on top of the frosting.

Wednesday, May 16, 2012

Hi-Ho, Hi-Ho....

Yes, I'm going out of town again. This time I get to go South and see my old alma mater! I really am going for work though. I am teaching my first class and get to go on a little three day vacation from fence building and all the other little projects we have going on here.

See you next week and until then, happy cupcaking!

Thursday, May 10, 2012

(White) Chocolate Rain!

Gosh, life is getting so busy already this summer! Between getting my yard ready, flowers planted, work, two cats, a dog, and a hubby, I find that I hardly have time to bake right now. Like, only a couple treats a week ;) So I'm delving into the Cupcakery archives for an old favorite. Chocolate cupcakes with white chocolate cream cheese frosting and strawberry filling. Mmmmmmmmm....*drool*. Even better, this recipe works great with just about any fruit, cherries, raspberries, blueberries. Basically anything you would pair with a cheesecake :D Perfect for summer time and all of this fresh produce I have!

White chocolate cream cheese frosting and strawberry filling! Yum!


Chocolate Cupcakes
1 box chocolate cake mix (and any eggs/oil/water called for on the box)

Prepare the cake according to the directions on the box and let cool.

Strawberry Filling
1 lb fresh strawberries
1/2 C white sugar (or 1/4 C honey/agave nectar for you healthier people)
1/4 C water

OR
2 C fresh strawberry jam

Wash, dry, and hull strawberries. In a large pot on the stove on medium high heat, mash strawberries with a potato masher. Add sugar/honey/agave and water. Bring to a boil and boil for five minutes or until you reach a jelly consistency. Be careful to keep stirring otherwise the bottom will scorch. Ew.
Let cool.

White Chocolate Cream Cheese Frosting
16 oz softened cream cheese (that's two bricks)
8 oz white chocolate (melted)
2-3 C powdered sugar
1 T vanilla
Cocoa powder


In a large mixing bowl combine the softened cream cheese and melted white chocolate. Add vanilla. Clear vanilla is best as it won't alter the color of this white frosting, but regular brown vanilla is totally cool too. I like to use Madagascar or Tahitian for frostings. Slowly add the powdered sugar. The amount depends on how stiff you need the frosting. As you can see in the picture above, I kept mine fairly soft.

Put the cupcakes together:
Take the unfrosted cupcakes and poke a decent sized hole in the top, just not all the way down to the liner. Using a spoon, bag or piping bag fill the holes with the strawberry deliciousness. Now either spread the frosting on with a knife or pipe it on. I used a large round tip for these ones since the frosting was too soft to hold the edges of a star tip. I dusted mine with cocoa powder. A slice of fresh strawberry on top would be awesome too!

What's your favorite fruit to use with cakes?

Wednesday, May 2, 2012

Willy Nilly Silly Ol' Bear

Well, I guess since Big Bear shared the story of the birthday cake he made me, I might as well tell you about the one I made for him last year. Not this year's cake, oh no, that one was a hot mess and there is no photographic evidence of it. Thank goodness he's such a good sport about it. Anyway, Le Big Bear is a big fan of Winnie the Pooh. Knowing this I set out to make him an unforgettable birthday cake and I think I succeeded pretty darn well. Now, we all know that I can't draw. Like, at all. But I figured out an ingenious way to draw Winnie on the cake with some balloons and the hubs, well, he loved it.
I'm not going to bore you with the details of what the cake was and how I made it. You all can probably already figure out that it was a box mix. But to make the bear I went on Google and searched for a decent picture of Winnie the Pooh. Once I found on that I was happy with I sized it to fit on a 1/8 sheet cake (half of a 9x13 cake roughly). I printed it out and cut out the image VERRRRRRY carefully. At this point, the cake is frosted with the final layer of buttercream, but none of the edge piping, words, or anything else were on there yet. I laid the image on the cake and made sure that I would have enough room for balloons and a message. As you can see, there was just barely room. I traced around the edge of the cut out image with a toothpick. You don't want to go super duper deep into the frosting, but deep enough that when you lift off the paper you will still see the outline. Once the outline was finished I lifted up the cut out and drew with a toothpick all of the lines that are in the black color just how they looked in the printed picture. Next step is to take a small piping/writing tip and fill in the toothpick lines with your outline color. Keep the printed picture handy for reference. After the outline is done, fill in with the appropriate colors. Voila! It looks like I really can draw!

Wednesday, April 25, 2012

When Little Bear's Away, Big Bear Gets to Play!

In honor of Little Bear's birthday this past week I, Big Bear, made her a super easy and super delicious Oreo Poke Cake. As a birthday present I asked LB to pick a dessert of her choice for me to make and she chose one that she had seen on Pinterest a while back. Luckily for me, it was one that even the most kitchen-challenged husband could attempt. It's all box mixes or pre-made ingredients that get put together to make a cake that nobody would know wasn't homemade.
I had no idea what a "poke cake" was when LB asked me to make one. I assumed that it was poked, but how and for what reason was beyond my comprehension. Turns out, after the cake is baked you poke it with the end of a mixing spoon and pour pudding into the holes. Makes sense.
LB graciously allowed me to take some of her birthday cake to work. Not to brag or anything, but it was so amazing nobody believed I made it instead of her. To quote a co-worker "This is the best, and most moist cake ever!"
See how the pudding absorbs into the cake?

Oreo Poke Cake
1 box chocolate cake mix (and any eggs/water/oil called for on the box)
1 small box instant vanilla pudding (and any milk called for on the box)
2 containers whipped topping

Take the whipped topping out of the freezer and put in the fridge to thaw. Mix and bake cake mix according to the instructions on the box in a greased 9x13 pan. Allow the cake to cool thoroughly (I stuck it in the freezer for 20 minutes to speed that up). After it is cooled, take the handle end of a wooden spoon and poke holes in the cake being careful not to punch down to the bottom of the pan. I did 5x10 for the holes. Next, mix the pudding and milk in something that is easy to pour from, like a large measuring cup. Slooooowly pour the pudding over the holes in the cake. There should not be any pudding pooled on top of the cake, so stop pouring if that starts to happen! If it absorbs, start pouring again until the cake can take no more. Put the cake in the fridge until the pudding is set. Right before serving the cake spread the two containers of whipped topping on top of the cake. This will impress, amaze, astonish, and/or astound all those who taste it.

Wednesday, April 18, 2012

Better Than Cinnamon Rolls

Have you ever found a recipe that was absolutely fantastic, one that was destined to become a family favorite, only to realize the main ingredient is seasonal?! I have. Cinnamon chip scones. They're mouth-wateringly delicious. But, stores stopped carrying cinnamon chips year round and they were only available around Christmas. Then, stores stopped carrying them at all. That was a sad few years in Little Bear World. But rejoice! Cinnamon chips have been found again! I cleared the shelf and sent 6 packages to Momma Bear while also stock piling my own stores. And so, without further ado....

Heaven. Seriously.
Cinnamon Chip Scones
2 C flour
4 t baking powder
3/4 t salt
1/4 C sugar
4 T butter (cold)
2 T shortening
3/4 C half and half
1 egg
1 t vanilla
1/2-3/4 bag of cinnamon chips (the whole bag is seriously just too much)
OPTIONAL: Lemon or orange zest

Preheat your oven to 350 degrees. In a large bowl combine the flour, baking powder, salt, and sugar. Cut in the butter and the shortening. The dough at this point should look crumbly but will stick together if you squeeze it. Slowly add the half and half, vanilla, and the egg. Fold in the cinnamon chips. At this point add in any optional citrus zest.
Flour a counter top and place the dough on the floured surface. Lightly coat your hands with flour and hand form the dough into a disc about 1/2 inch thick. I usually just squish it until it looks about right. If you have a biscuit cutter, by all means, use that. I'm not that fancy and just use a drinking glass to cut out my scones and biscuits.
Place on a regular, ungreased cookie sheet and bake for about 12-15 minutes. NOTE: The scones will not, I repeat, will NOT brown. If you cook them until they look all golden delicious on the outside, they'll be hard as rocks inside. Not tasty.
After baking, place on racks to cool. Enjoy as I did with a nice glass of moo juice!

As always my friends, check us out on Facebook at Little Bear's Cupcakery

Wednesday, April 11, 2012

Here Comes Peter Cottontail

Hope you all had a fabulous Zombie Jesus Day Easter! My lucky coworkers were treated to an Easter cake worthy of pictures. And nomming. There was much nomming going on at the office this weekend. With how put together this cake looked, I was shocked by how easily it all went together. I would have made some headache reducing changes though, and I'll let you know what those are.

Easter Cake
1 box cake mix and any eggs/oil/water called for on the box (I used chocolate)
1 batch white buttercream (in two separate bowls, 1 1/2 C in one, the remainder in the other)
1/4 C Cocoa powder sifted
1 t Chocolate extract
Green food coloring
Wax paper
2 jumbo packs of Kit Kat bars (or Twix, or Cadbury Fingers)
Cadbury eggs, or Robin's Egg Whoppers
Mini chocolate bunnies

Go ahead and make the cake mix as it is called for on the box. Spray two 8 inch round cake pans with non-stick spray. Evenly divide the cake mix between the pans and bake at 350 for about 20 minutes. Check for doneness at about 18 minutes and keep an eye on those cakes! Let cool for about 30 minutes while you're making the frosting and whatnot.
Tint the 1 1/2 C buttercream with green food coloring, set aside. With the remaining frosting, mix in the cocoa powder and chocolate extract.
Pick a serving platter/plate/tray or whatever you want to present the cake on. Tear off strips of wax paper and line the edges of that serving dish. This way you will have a clean plate and a cake you didn't have to move. Once the cakes are cooled, invert one out of the pan and place it bottom side down (or right side up) on top of the wax paper. You'll want to see about 1/2 inch to an inch of wax paper from the side of the cake. Spread half of your chocolate frosting on top of this cake, this will be the filling. Don't worry about making the sides perfect, you won't see them anyway. Invert the second cake out of the pan and place it bottom side up (or upside down) on top of the chocolate frosting. With the remaining chocolate frosting, frost the sides of the cake. Again, don't worry about it being perfect, no one will see this anyway it's just glue for the candy.

*Headache reducing tip!* I wish I had done this, it would have looked just as cute but with way less stress. Spread 3/4 of the green frosting on top of the cake. With a spaghetti tip, pipe in some clumps of grass to hide the candy eggs in. I did the whole top as grass and I blew out two frosting bags and it took me an hour. Sigh. Massive headache. Also, do the grass first to avoid getting green all over the side of the fence. Oh well, I know for next time now!
Unwrap the Kit Kat bars and line them up against the side of the cake to look like a fence. I did break mine in half before doing this to move around the round cake more easily.


Place the candy eggs and chocolate bunnies on the 'grass' on top. CAREFULLY pull out the wax paper. Hold against the cake with one hand and slowly pull with the other. You don't want to undo all that work.
This cake (without piping an 8 inch round of grass, blah) took me about an hour and a half. Including baking time, cooling time, and decorating time. Awesome! If you have an extra hour to spare and several piping bags you don't mind losing, go ahead and grass the entire top of the cake :D
For a super sweet presentation, find a pretty yellow or green ribbon and tie it around the cake with a big ol' bow in front. 


What awesome desserts and treats did you all make for Easter?

Wednesday, April 4, 2012

As American as...Pear Pie?

It sounds strange, I know. The other day I found myself in need of a quick dessert, and as I had two apples and two pears, I thought to myself "Self, why not a pie?" But I knew I didn't have enough apples for a whole pie. Out of luck. Or was I? Pears have a very similar texture and slightly sweeter flavor than apples, and if I mixed some in with the apples no one would be able to tell. Right? Absolutely. So while I was running around my newly renovated pantry (thanks Big Bear!), I was trying to think of what flavor profile to use in a pear pie. Hmmm, cinnamon and nutmeg, standard for apple pie, check. Ginger? Ooooh, two kinds of ginger? YES PLEASE! So this is the story, all about how, the apple pie got flipped, turned upside down. And mixed with pears.
I didn't get a picture in before my coworkers started to devour it. Sorry...

Super Flaky Pie Crust
1 C butter (softened)
1 C flour
1 t salt
1/4 C water (cold)

Apple-Pear Pie Filling
2 medium apples
2 medium firm pears
1/4 C sugar
2 t cinnamon
1/2 t nutmeg
1 t ground ginger
2 T crystallized ginger
4 T flour
2 t caramel extract/sauce

Crumbly Topping
1/2 C butter (softened)
1/2 C brown sugar
1/4 C flour

Start with the pie crust (if you aren't using a pre-made dough. I won't tell anyone if you are). In your mixer cream the butter with itself. Slowly add in the salt, then the flour. If you use salted butter, omit the extra salt. Slooowly add the water (you may not use the entire 1/4 C, or you might need more.) Once the dough will more or less come together with pressure from your hands, you'll want to stop with the water. Place the dough on a sheet of plastic wrap and wrap tightly into a ball. Refrigerate for up to an hour. I usually just stick it in there while the oven is pre-heating and I'm getting my filling together.

For the filling. Peal the apples and pears. I usually slice mine into quarters, core it, then each quarter into thirds, then each third into chunks (usually 1/3 to 1/4 of each slice). Put all that yummylicious fruit into a big bowl and add the sugar, cinnamon, nutmeg, ground ginger, flour, and caramel extract/sauce. Don't add the crystallized ginger here. Preheat the oven to 375.

By now your dough should have rested enough. If it hasn't been in the fridge for at least 30 minutes go grab yourself a cocktail and come back later. Now it should be between 30-60 minutes. Flour a flat surface, such as a counter or a silpat mat. Flour a rolling pin and start rolling out one big pie circle. Don't worry about uneven edges, you'll cut those off after it's in the pan. The dough should be about 1/4 inch thick, and about 12-15 inches across. Spray and flour a pie pan. Flip the pie pan on top of the rolled out dough. Using your hands to help, or a spatula, get under the dough and push it into the pan while turning right side up. Yay! You're almost there! Mold the dough to the shape of the pie pan, allowing the excess dough to hang off the edges. Take a butter knife, or any other non-sharp knife, and cut the excess off. Reserve that for a few minutes from now. Using a fork, prick the bottom of the pie dough. This allows steam to escape during the baking process so your crust doesn't go all weird shapes on you and ends up tender and flaky. Pour the filling into the pan, spread around evenly. Now you get to sprinkle the crystallized ginger on top of the apple/pear mixture.

For the topping, cream together the brown sugar and butter. Add the flour. Drop globs of it all of the top of the pie. Mmmm...globs.

With the reserved dough, roll it out again. Again, about 1/4 inch thick. Go grab a cute little cookie cutter. I used a ducky for the upcoming Easter holiday. Place the cutout dough around the edge of the pie.
Bake at 375 for about 30 minutes and then lower the heat to 325 for the last 30 minutes. If the crust starts to brown too much, use a crust guard or some foil around the edges.

What other sorts of strange pie combinations have you come up with?

Thursday, March 29, 2012

Melts in Your Mouth, Not in Your Hands

Mmmmm...just the title makes it sound delicious. By the way, sorry for the delay in the post, I had some company this weekend. My mom, Momma Bear, and Big Bear's aunt came up to visit for my "weekend". We had a fabulous time and I have no regrets of not being in the kitchen for the blog this weekend. Anyway, this week we have some melt-in-your-mouth delicious cookies otherwise known as shortbread. Not just regular shortbread though, no no. We have Nutella shortbread and peanut butter-butterscotch shortbread. *Insert pause to wipe up drool here* Without further ado...

Nutella Shortbread and Peanut Butter-Butterscotch Shortbread


Nutella Shortbread Cookies
1 stick unsalted butter (1/2 C) softened
1/2 C Nutella
1 t vanilla (the real stuff for this, not the imitation)
1 1/4 C flour
1/4 C powdered sugar
1/4 t salt
Plastic cling wrap
Parchment paper/SilPat mat

These cookies whip together so quickly, it's awesome. To start, cream together the butter and Nutella. Add the vanilla and slowly incorporate the flour, powdered sugar, and salt. The dough will probably look pretty crumbly at this point, it's ok. turn the dough out onto a length of cling wrap and smoosh it together. It will start to clump. Use the plastic wrap to help mold it into a log shape. Wrap in the plastic and put in the freezer while you heat the oven to 325. Once the oven is heated, take the dough out of the freezer and using a VERY sharp knife (I use ceramic for this) slice the log into cookies about 1/3 inch thick. They will spread a bit, so place them about 1-2 inches apart on a cookie sheet lined with parchment paper or a SilPat. Bake for 12-14 minutes. They absolutely will look soft and undone coming out of the oven. I swear, they're done. Do NOT over bake these. The magic of these cookies is the soft, buttery, melt in your mouth-ness that comes from not over baking. Cool on the cookie sheet for about 5 minutes and transfer to a wire rack to finish cooling. Om nom nom time!

Peanut Butter-Butterscotch Shortbread Cookies
1 stick unsalted butter (1/2 C) softened
1/2 C creamy peanut butter
1 t vanilla (the real stuff for this, not the imitation)
1 1/4 C flour
1/4 C powdered sugar
1/4 t salt
1/3 C butterscotch chips
Plastic cling wrap
Parchment paper/SilPat mat

To start, cream together the butter and peanut butter. Add the vanilla and slowly incorporate the flour, powdered sugar, and salt. Fold in the butterscotch chips The dough will probably look pretty crumbly at this point, it's ok. turn the dough out onto a length of cling wrap and smoosh it together. It will start to clump together. Use the plastic wrap to help mold it into a log shape. Wrap in the plastic and put in the freezer while you heat the oven to 325. Once the oven is heated, take the dough out of the freezer and using a VERY sharp knife (I use ceramic for this) slice the log into cookies about 1/3 inch thick. The sharp knife is super important for these ones as the chips make it a little more difficult to cut through the log. They will spread a bit, so place them about 1-2 inches apart on a cookie sheet lined with parchment paper or a SilPat. Bake for 12-14 minutes. They absolutely will look soft and undone coming out of the oven. I swear, they're done. Do NOT over bake these. The magic of these cookies is the soft, buttery, melt in your mouth-ness that comes from not over baking. Cool on the cookie sheet for about 5 minutes and transfer to a wire rack to finish cooling. Om nom nom time!


If you can wait to bake these (and I don't know how you could), or just want some 'do ahead' type cookies, leave them at the freezer stage and pick back up whenever the day comes that you want to bake them. Perfect for if you just want 1-2 cookies at a time (I don't know why you would) or if you do freezer cooking for the month.


What other combinations of flavors do you think would be good as a shortbread cookie? Chocolate cookie and mint chips?

Saturday, March 24, 2012

Back to the Basics: Wrapping it up

Still have your wax paper, buttercream, pastry bags, and scrapery thingy out from the last few days? Perfect! Today I have for you the last few tips that I got to play with earlier this week. They include: a leaf tip, grass tip, basket weave tip, angled star tip, and a ribbon tip. Woohoo! What a collection!

First up: the leaf tip (aka tips #67, 352 small and 352 wide)
Leaf tips #67, 352 small, and 352 wide
Now that you have some tips to make some super cute flowers like hydrangeas and sunflowers, you'll need to add some leaves to those flowers! To make a leaf hold the bag at a 45 degree angle to the decorating surface. One of the 'v' tips should be touching the cake, the other should be directly above it. Start to squeeze the bag until the base of the leaf is as wide as you want it, then start slowly dragging the tip towards you. The top 'v' will make a vein through the center of the leaf. If you wiggle your hand a little as you drag the bag, you'll get a more 3D looking leaf with some character. As you get to the end of the leaf stop squeezing and pull upwards. If you want the leaf to curve, pull the bag slightly to one side or the other. Voila! A leaf!

Next, we have the grass tip (aka spaghetti tip) You'll notice this one doesn't have a number, well, it doesn't. There's really only one grass tip. It looks like a thimble.
Grass tip
To make grass (perfect, by the way, for any upcoming Easter cupcakes!), hold the bag at a 90 degree angle above the decorating surface. Do not touch the surface with the tip, but rather start squeezing when you're just above it. When you have enough length, stop squeezing and pull directly up. Do lots and lots for a grassy knoll or a little hill. You'll want to even fill in holes by piping grass on top of other grass.
This tip is also perfect for spaghetti, piles of noodles, and bird nests. For spaghetti and piles of noodles, start as you did with the grass, but instead of stopping and pulling away, continue squeezing until you have a nice little pile of noodles. For a birds nest, start like you would for a cupcake swirl, but instead of swirling in, just build on top and slightly outside of the first round. TaDah! Perfect little resting spot for some robin's eggs.

Now we have: a basket weave tip (aka tip #47)
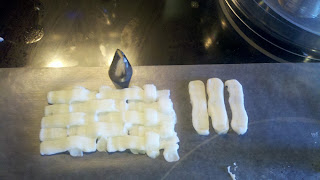
Basket weave tip #47
Perfect for some Easter baskets, or just any basket, the basket weave tip is way easier than it looks. Great for you because your friends will think you put tons of work into making the cake look so amazing, when really, it's not that hard. By the way, larger versions of this tip are great for putting down a base layer of buttercream on layer cakes.
To make a basket weave, hold the bag at a 45 degree angle to the decorating surface with the toothed edge up and the smooth edge touching the cake. Start with your vertical lines, make as many as you will need. Space between the vertical lines about the width of your frosting tip. Once you have all of your vertical lines, start with the horizontal lines, again with the toothed edge up and the smooth edge on the surface. Go over/under the vertical lines making sure to end the over lines at the next vertical line.
What a cute basket you have now!

Finally, perfect for a little girl's (or big girl's) cake: the ruffle tip (aka tip #224) Tip number 107 is very similar, but will give a more angled ruffle than the 224.
Ruffle tip #224
Whether you're simply adding a border to a cake, or a ruffle to a skirt, this tip is a great choice! To make the ruffle, hold the bag at a 45 degree angle to the cake and in front of the ruffle you are making (not above). With the tip barely touching the surface squeeze the bag and move the tip up and down (remember, use your whole arm to decorate, not just your hand!). Soon you'll have a whole stretch of princess/diva worthy ruffles!

Let me know how your practicing goes! As always, check us out on Facebook at Little Bear's Cupcakery

Friday, March 23, 2012

Back to the Basics: French Tips

Back to the basics is here again, so grab your frosting, pastry bags, wax paper and your frosting tips, it's time for some frosting fun!

Another great choice for cupcake swirls is the French tip frosting tip. You'll be able to recognize it by the many, many, many little points around the opening. Another great use for it besides swirls on cupcakes and borders on cakes though is using it to make sunflowers! It's super easy, and just like the star tip you start with the bag at 90 degrees straight up and down above where you want the flower. Make sure the tip is touching the decorating surface before you start to squeeze, and then lift directly up! The longer you squeeze, the larger and longer your petals will be.


#32, 863, and 867

The tips I used in the picture are 32, 863, and 867. Again, the triple digit numbers will need a larger weight pastry bag than the double digit numbers. Tip number 199 is a great choice too, even though it's not pictured here.

Thursday, March 22, 2012

Back to the Basics: Star Tips

Ok, so yesterday we went over the round or writing tips, and today I have some star tips to show you. They're called this because....they make stars! How easy to remember is that? I have quite a few sizes and that's great for when I do cupcakes. You won't want to use the largest size on mini cupcakes, and it'll take for ever to frost jumbo cupcakes with the smallest star tip. The smaller numbers are logically the smaller tips, but the triple digit numbers will use a larger weight pastry bag (a 16 or 18 usually) and the double digit numbers will usually use the smaller weight pastry bags (12 or 14).
Tips #16, 24, 74, 822, and 828
I use the 822 and 828 for doing cupcakes and larger cake borders, and the 16, 24, and 74 for flowers, stars, and small borders. A good tip to remember when making stars is to keep the pastry bag at 90 degrees, put the tip to the surface then squeeze, and lift directly up. For flowers, do the same except for twist about 15 degrees before lifting up for a more 3D petal effect.

Practice on some wax paper to get it right before trying it on your cake. But, if you do make a mistake, it's super easy to fix, just get your spreader/scraper/flat knife and gently lift the edge of the mistake. It should pop right off!

Have fun playing!

Wednesday, March 21, 2012

Back to the Basics: Writing Tips

I realized the other day that I have a tool caddy just full of pastry tips, many of which I have never used before. Now, to my credit, many are the same style of tip just different sizes, but there are several that I just flat out have never used. So what did I do with my Sunday today? Of course I spent about 2 hours whipping up a batch of basic white buttercream and playing with my frosting tips! I was in heaven. Today I have compiled a group of pictures to help you sort out which tip is best for which style of frosting you would like to achieve. Yay! A compendium of knowledge! Oh be still my nerdy little heart.
If you have a caddy full of tips, or even just want to practice with the few that you do have, it's easy and you don't even waste any frosting.

You will need:
1 batch of basic buttercream frosting
Wax paper
Pastry bags
Spatula/spreader/flat scraper thingy
Tips

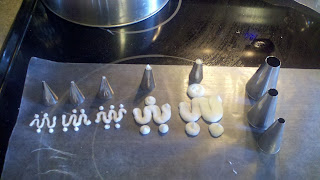
Lets start out with an easy one, writing tips. I used tips #2, 3, 4, 10, and 12. As you can see, they get bigger and bigger. 
Writing tips 2, 3, 4, 10, and 12

I like #2 best for fine detail work. Just be careful that the frosting you are using is very smooth and not stiff at all. The tiny hole on this tip makes it difficult to work with stiff frosting. #3 is my favorite for writing. It's not too small, but not so big that the letters run together, great for script. #4, 10, and 12 all work really well for polka dots depending on the size of dot that you want. The three on the side there? Huge. Ginormous. They would basically make polka dots the size of a VW beetle. I'm probably never going to use them.

To write a message using one of these tips it's important to remember to keep the bag at a 45 degree angle to the cake, the tip fairly close to the surface, and to move your whole arm not just your hand. If the frosting is breaking, you are either going too fast or your frosting is too thick. If the frosting is gobbing, smooshing, or too wide, you're going too slowly. If the frosting is coming out like ribbons and is very shaky, you need to be closer to the cake.  If your tip is dragging through the letters, well, move back. You're obviously too close. Air bubbles can cause blowouts through the tip and make a mess. Use a scraper/spreader/very flat knife to pick up the oopsies and then squeeze the pastry bag to work out any air bubbles. Practice your writing on wax paper like I did with the squiggles and dots above. It just takes practice!

Ok, now here is where you find out why you won't be wasting any of this yummy yummy frosting. Take your spatula/spreader/flat scraper thingy and scrape the frosting off the wax paper (perfect to wipe out those oopsies too!) and back into your container or mixing bowl. Yay! No waste! You can totally keep this frosting for up to 2 weeks and use it on an upcoming cake.

Make sure to like us on Facebook! Little Bear's Cupcakery