Welcome to Little Bear's Cupcakery! Here we have a special treat each week and tell you how to make it for yourself!
Don't want to or don't have time to make it yourself? Check out our website, www.LittleBearsCupcakery.weebly.com to order a batch of the best cupcakes, cakes, cookies, and other yummies around.
Make sure to 'like' us on Facebook too!

Wednesday, March 21, 2012

Back to the Basics: Writing Tips

I realized the other day that I have a tool caddy just full of pastry tips, many of which I have never used before. Now, to my credit, many are the same style of tip just different sizes, but there are several that I just flat out have never used. So what did I do with my Sunday today? Of course I spent about 2 hours whipping up a batch of basic white buttercream and playing with my frosting tips! I was in heaven. Today I have compiled a group of pictures to help you sort out which tip is best for which style of frosting you would like to achieve. Yay! A compendium of knowledge! Oh be still my nerdy little heart.
If you have a caddy full of tips, or even just want to practice with the few that you do have, it's easy and you don't even waste any frosting.

You will need:
1 batch of basic buttercream frosting
Wax paper
Pastry bags
Spatula/spreader/flat scraper thingy
Tips
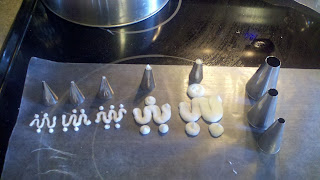
Lets start out with an easy one, writing tips. I used tips #2, 3, 4, 10, and 12. As you can see, they get bigger and bigger. 
Writing tips 2, 3, 4, 10, and 12

I like #2 best for fine detail work. Just be careful that the frosting you are using is very smooth and not stiff at all. The tiny hole on this tip makes it difficult to work with stiff frosting. #3 is my favorite for writing. It's not too small, but not so big that the letters run together, great for script. #4, 10, and 12 all work really well for polka dots depending on the size of dot that you want. The three on the side there? Huge. Ginormous. They would basically make polka dots the size of a VW beetle. I'm probably never going to use them.

To write a message using one of these tips it's important to remember to keep the bag at a 45 degree angle to the cake, the tip fairly close to the surface, and to move your whole arm not just your hand. If the frosting is breaking, you are either going too fast or your frosting is too thick. If the frosting is gobbing, smooshing, or too wide, you're going too slowly. If the frosting is coming out like ribbons and is very shaky, you need to be closer to the cake.  If your tip is dragging through the letters, well, move back. You're obviously too close. Air bubbles can cause blowouts through the tip and make a mess. Use a scraper/spreader/very flat knife to pick up the oopsies and then squeeze the pastry bag to work out any air bubbles. Practice your writing on wax paper like I did with the squiggles and dots above. It just takes practice!

Ok, now here is where you find out why you won't be wasting any of this yummy yummy frosting. Take your spatula/spreader/flat scraper thingy and scrape the frosting off the wax paper (perfect to wipe out those oopsies too!) and back into your container or mixing bowl. Yay! No waste! You can totally keep this frosting for up to 2 weeks and use it on an upcoming cake.

Make sure to like us on Facebook! Little Bear's Cupcakery

No comments:

Post a Comment

Note: Only a member of this blog may post a comment.