Welcome to Little Bear's Cupcakery! Here we have a special treat each week and tell you how to make it for yourself!
Don't want to or don't have time to make it yourself? Check out our website, www.LittleBearsCupcakery.weebly.com to order a batch of the best cupcakes, cakes, cookies, and other yummies around.
Make sure to 'like' us on Facebook too!

Thursday, March 29, 2012

Melts in Your Mouth, Not in Your Hands

Mmmmm...just the title makes it sound delicious. By the way, sorry for the delay in the post, I had some company this weekend. My mom, Momma Bear, and Big Bear's aunt came up to visit for my "weekend". We had a fabulous time and I have no regrets of not being in the kitchen for the blog this weekend. Anyway, this week we have some melt-in-your-mouth delicious cookies otherwise known as shortbread. Not just regular shortbread though, no no. We have Nutella shortbread and peanut butter-butterscotch shortbread. *Insert pause to wipe up drool here* Without further ado...

Nutella Shortbread and Peanut Butter-Butterscotch Shortbread


Nutella Shortbread Cookies
1 stick unsalted butter (1/2 C) softened
1/2 C Nutella
1 t vanilla (the real stuff for this, not the imitation)
1 1/4 C flour
1/4 C powdered sugar
1/4 t salt
Plastic cling wrap
Parchment paper/SilPat mat

These cookies whip together so quickly, it's awesome. To start, cream together the butter and Nutella. Add the vanilla and slowly incorporate the flour, powdered sugar, and salt. The dough will probably look pretty crumbly at this point, it's ok. turn the dough out onto a length of cling wrap and smoosh it together. It will start to clump. Use the plastic wrap to help mold it into a log shape. Wrap in the plastic and put in the freezer while you heat the oven to 325. Once the oven is heated, take the dough out of the freezer and using a VERY sharp knife (I use ceramic for this) slice the log into cookies about 1/3 inch thick. They will spread a bit, so place them about 1-2 inches apart on a cookie sheet lined with parchment paper or a SilPat. Bake for 12-14 minutes. They absolutely will look soft and undone coming out of the oven. I swear, they're done. Do NOT over bake these. The magic of these cookies is the soft, buttery, melt in your mouth-ness that comes from not over baking. Cool on the cookie sheet for about 5 minutes and transfer to a wire rack to finish cooling. Om nom nom time!

Peanut Butter-Butterscotch Shortbread Cookies
1 stick unsalted butter (1/2 C) softened
1/2 C creamy peanut butter
1 t vanilla (the real stuff for this, not the imitation)
1 1/4 C flour
1/4 C powdered sugar
1/4 t salt
1/3 C butterscotch chips
Plastic cling wrap
Parchment paper/SilPat mat

To start, cream together the butter and peanut butter. Add the vanilla and slowly incorporate the flour, powdered sugar, and salt. Fold in the butterscotch chips The dough will probably look pretty crumbly at this point, it's ok. turn the dough out onto a length of cling wrap and smoosh it together. It will start to clump together. Use the plastic wrap to help mold it into a log shape. Wrap in the plastic and put in the freezer while you heat the oven to 325. Once the oven is heated, take the dough out of the freezer and using a VERY sharp knife (I use ceramic for this) slice the log into cookies about 1/3 inch thick. The sharp knife is super important for these ones as the chips make it a little more difficult to cut through the log. They will spread a bit, so place them about 1-2 inches apart on a cookie sheet lined with parchment paper or a SilPat. Bake for 12-14 minutes. They absolutely will look soft and undone coming out of the oven. I swear, they're done. Do NOT over bake these. The magic of these cookies is the soft, buttery, melt in your mouth-ness that comes from not over baking. Cool on the cookie sheet for about 5 minutes and transfer to a wire rack to finish cooling. Om nom nom time!


If you can wait to bake these (and I don't know how you could), or just want some 'do ahead' type cookies, leave them at the freezer stage and pick back up whenever the day comes that you want to bake them. Perfect for if you just want 1-2 cookies at a time (I don't know why you would) or if you do freezer cooking for the month.


What other combinations of flavors do you think would be good as a shortbread cookie? Chocolate cookie and mint chips?

Saturday, March 24, 2012

Back to the Basics: Wrapping it up

Still have your wax paper, buttercream, pastry bags, and scrapery thingy out from the last few days? Perfect! Today I have for you the last few tips that I got to play with earlier this week. They include: a leaf tip, grass tip, basket weave tip, angled star tip, and a ribbon tip. Woohoo! What a collection!

First up: the leaf tip (aka tips #67, 352 small and 352 wide)
Leaf tips #67, 352 small, and 352 wide
Now that you have some tips to make some super cute flowers like hydrangeas and sunflowers, you'll need to add some leaves to those flowers! To make a leaf hold the bag at a 45 degree angle to the decorating surface. One of the 'v' tips should be touching the cake, the other should be directly above it. Start to squeeze the bag until the base of the leaf is as wide as you want it, then start slowly dragging the tip towards you. The top 'v' will make a vein through the center of the leaf. If you wiggle your hand a little as you drag the bag, you'll get a more 3D looking leaf with some character. As you get to the end of the leaf stop squeezing and pull upwards. If you want the leaf to curve, pull the bag slightly to one side or the other. Voila! A leaf!

Next, we have the grass tip (aka spaghetti tip) You'll notice this one doesn't have a number, well, it doesn't. There's really only one grass tip. It looks like a thimble.
Grass tip
To make grass (perfect, by the way, for any upcoming Easter cupcakes!), hold the bag at a 90 degree angle above the decorating surface. Do not touch the surface with the tip, but rather start squeezing when you're just above it. When you have enough length, stop squeezing and pull directly up. Do lots and lots for a grassy knoll or a little hill. You'll want to even fill in holes by piping grass on top of other grass.
This tip is also perfect for spaghetti, piles of noodles, and bird nests. For spaghetti and piles of noodles, start as you did with the grass, but instead of stopping and pulling away, continue squeezing until you have a nice little pile of noodles. For a birds nest, start like you would for a cupcake swirl, but instead of swirling in, just build on top and slightly outside of the first round. TaDah! Perfect little resting spot for some robin's eggs.

Now we have: a basket weave tip (aka tip #47)
Basket weave tip #47
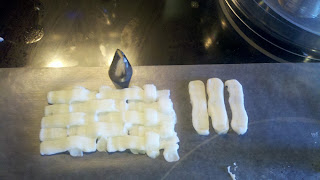
Perfect for some Easter baskets, or just any basket, the basket weave tip is way easier than it looks. Great for you because your friends will think you put tons of work into making the cake look so amazing, when really, it's not that hard. By the way, larger versions of this tip are great for putting down a base layer of buttercream on layer cakes.
To make a basket weave, hold the bag at a 45 degree angle to the decorating surface with the toothed edge up and the smooth edge touching the cake. Start with your vertical lines, make as many as you will need. Space between the vertical lines about the width of your frosting tip. Once you have all of your vertical lines, start with the horizontal lines, again with the toothed edge up and the smooth edge on the surface. Go over/under the vertical lines making sure to end the over lines at the next vertical line.
What a cute basket you have now!

Finally, perfect for a little girl's (or big girl's) cake: the ruffle tip (aka tip #224) Tip number 107 is very similar, but will give a more angled ruffle than the 224.
Ruffle tip #224
Whether you're simply adding a border to a cake, or a ruffle to a skirt, this tip is a great choice! To make the ruffle, hold the bag at a 45 degree angle to the cake and in front of the ruffle you are making (not above). With the tip barely touching the surface squeeze the bag and move the tip up and down (remember, use your whole arm to decorate, not just your hand!). Soon you'll have a whole stretch of princess/diva worthy ruffles!

Let me know how your practicing goes! As always, check us out on Facebook at Little Bear's Cupcakery

Friday, March 23, 2012

Back to the Basics: French Tips

Back to the basics is here again, so grab your frosting, pastry bags, wax paper and your frosting tips, it's time for some frosting fun!

Another great choice for cupcake swirls is the French tip frosting tip. You'll be able to recognize it by the many, many, many little points around the opening. Another great use for it besides swirls on cupcakes and borders on cakes though is using it to make sunflowers! It's super easy, and just like the star tip you start with the bag at 90 degrees straight up and down above where you want the flower. Make sure the tip is touching the decorating surface before you start to squeeze, and then lift directly up! The longer you squeeze, the larger and longer your petals will be.


#32, 863, and 867

The tips I used in the picture are 32, 863, and 867. Again, the triple digit numbers will need a larger weight pastry bag than the double digit numbers. Tip number 199 is a great choice too, even though it's not pictured here.

Thursday, March 22, 2012

Back to the Basics: Star Tips

Ok, so yesterday we went over the round or writing tips, and today I have some star tips to show you. They're called this because....they make stars! How easy to remember is that? I have quite a few sizes and that's great for when I do cupcakes. You won't want to use the largest size on mini cupcakes, and it'll take for ever to frost jumbo cupcakes with the smallest star tip. The smaller numbers are logically the smaller tips, but the triple digit numbers will use a larger weight pastry bag (a 16 or 18 usually) and the double digit numbers will usually use the smaller weight pastry bags (12 or 14).
Tips #16, 24, 74, 822, and 828
I use the 822 and 828 for doing cupcakes and larger cake borders, and the 16, 24, and 74 for flowers, stars, and small borders. A good tip to remember when making stars is to keep the pastry bag at 90 degrees, put the tip to the surface then squeeze, and lift directly up. For flowers, do the same except for twist about 15 degrees before lifting up for a more 3D petal effect.

Practice on some wax paper to get it right before trying it on your cake. But, if you do make a mistake, it's super easy to fix, just get your spreader/scraper/flat knife and gently lift the edge of the mistake. It should pop right off!

Have fun playing!

Wednesday, March 21, 2012

Back to the Basics: Writing Tips

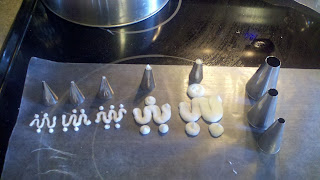
I realized the other day that I have a tool caddy just full of pastry tips, many of which I have never used before. Now, to my credit, many are the same style of tip just different sizes, but there are several that I just flat out have never used. So what did I do with my Sunday today? Of course I spent about 2 hours whipping up a batch of basic white buttercream and playing with my frosting tips! I was in heaven. Today I have compiled a group of pictures to help you sort out which tip is best for which style of frosting you would like to achieve. Yay! A compendium of knowledge! Oh be still my nerdy little heart.
If you have a caddy full of tips, or even just want to practice with the few that you do have, it's easy and you don't even waste any frosting.

You will need:
1 batch of basic buttercream frosting
Wax paper
Pastry bags
Spatula/spreader/flat scraper thingy
Tips

Lets start out with an easy one, writing tips. I used tips #2, 3, 4, 10, and 12. As you can see, they get bigger and bigger. 
Writing tips 2, 3, 4, 10, and 12

I like #2 best for fine detail work. Just be careful that the frosting you are using is very smooth and not stiff at all. The tiny hole on this tip makes it difficult to work with stiff frosting. #3 is my favorite for writing. It's not too small, but not so big that the letters run together, great for script. #4, 10, and 12 all work really well for polka dots depending on the size of dot that you want. The three on the side there? Huge. Ginormous. They would basically make polka dots the size of a VW beetle. I'm probably never going to use them.

To write a message using one of these tips it's important to remember to keep the bag at a 45 degree angle to the cake, the tip fairly close to the surface, and to move your whole arm not just your hand. If the frosting is breaking, you are either going too fast or your frosting is too thick. If the frosting is gobbing, smooshing, or too wide, you're going too slowly. If the frosting is coming out like ribbons and is very shaky, you need to be closer to the cake.  If your tip is dragging through the letters, well, move back. You're obviously too close. Air bubbles can cause blowouts through the tip and make a mess. Use a scraper/spreader/very flat knife to pick up the oopsies and then squeeze the pastry bag to work out any air bubbles. Practice your writing on wax paper like I did with the squiggles and dots above. It just takes practice!

Ok, now here is where you find out why you won't be wasting any of this yummy yummy frosting. Take your spatula/spreader/flat scraper thingy and scrape the frosting off the wax paper (perfect to wipe out those oopsies too!) and back into your container or mixing bowl. Yay! No waste! You can totally keep this frosting for up to 2 weeks and use it on an upcoming cake.

Make sure to like us on Facebook! Little Bear's Cupcakery

Wednesday, March 14, 2012

Here Comes the Bride!

Ok, so it's not technically an edible cake, but I made a super cute 'cake' this week made out of kitchen tea towels and utensils. One of my good friends is getting married this summer and I thought this would be such a sweet idea for her wedding shower. Basically, the 'cake' is made of tea towels, held together by pins and ribbon, and stuffed with kitchen utensils, gadgets, and goodies. It makes a wonderful centerpiece and a great conversation piece!
Kitchen Tea Towel Cake!

Towel Cake
18 tea towels (Kohl's had a great deal on their Big Towel packs)
Ribbon
Pearlized straight pins
Small safety pins
Utensils, gadgets, and goodies

To start, separate out the towels into three piles. 2 towels for the top tier, 6 towels for the middle tier, and 10 towels for the bottom tier. Lets start with the bottom tier. Fold the towel lengthwise into thirds (a hot dog fold). With the safety pins, pin the right end together securely (I used three pins). Take another towel, fold into thirds and place under the first towel on the left side with about two inches overlapping. Pin the two towels together (2-3 pins should do it). Start rolling from right to left, trying to keep a fairly tight, even roll. Continue this way until you have used all ten towels. When you get to the last towel, do not safety pin it, instead use the decorative pearlized straight pins to pin the edge.
For the second tier, fold the towels into halves lengthwise (again, a hot dog fold) and repeat the same as the bottom tier.
On the top tier, fold the towel in thirds, and then in half lengthwise. Repeat the same joining process as the other two tiers.
The tiers should hold together well enough without ribbon, but I liked the look of ribbon around the tiers. You can put it through the middle of the tier, at the base of each tier, however you want the cake to look. I added ribbon bows by looping a length of ribbon 5-6 times around my flat hand. Cut two v shapes towards the middle of the ribbon, then take another length of ribbon (maybe 6-8 inches) and tie it together through the v shapes. Pull the loops out from the middle, alternating pulling to the left and to the right. Cut the ends of the ribbon at an angle and pin onto the cake. Repeat for however many bows you would like.
Stack the tiers together and start placing in your utensils, gadgets, and goodies.

You can change this up by doing bath towels and putting in fun bathroom items like bath salts, soaps, etc.

Wednesday, March 7, 2012

It's the Luck O' the Irish!

Just in time for St. Patrick's Day we have a couple of cupcakes that will tempt even the most mischievous little leprechaun. One is a little more basic and easier to do. Perfect for those last minute treats. The other...well, you'll need at least two days and maybe a helper or two. The end result, though, is worth all the work.
First up is a basic chocolate cupcake with white buttercream. (Yields: 2 dozen)

Cake
1 box chocolate cake mix (and any eggs/water/oil called for on the box)

White Buttercream
2/3 C room temperature butter
1 C shortening (I use Crisco)
4 C powdered sugar
2 t vanilla
1/4-1/2 C milk

Leprechaun cupcakes!
Mix and bake the cupcakes according to box instructions. I like to go at 350 for about 18 minutes. While the cupcakes are cooling, blend together the butter and shortening. Slowly and carefully add the powdered sugar. Once the powdered sugar is incorporated add the vanilla, and slowly add the milk until you reach a fluffy, spreadable consistency. At this point, if you want to have a colored frosting this is when you add the food coloring. Try to stay away from the liquid food colorings and try for the gel or powder colors. Walmart has them in the cake decorating section (Wilton brand), and I get mine at the Ben Franklin. For these cupcakes I used my airbrush, so I left the frosting white.
Using a 16 weight pastry bag and a large star tip, I swirled the frosting into a little peak. I then air brushed the frosting with the green, and added some green sprinkles. YUM!


Grab the gold before the leprechaun can!
Now for the more difficult cupcakes. I would classify these as being about an intermediate level, especially if you have a helper. What makes these cupcakes so special is the cake itself. When you bite into it you'll see a rainbow! It looks like it's super difficult to do, but in reality, it's just a couple extra steps.
For one batch of these End of the Rainbow cupcakes, you will need:


Cake
1 box white cake mix (any eggs/oil/water called for on the box)
Red, Orange, Yellow, Green, Blue, and Purple gel/powder food coloring

Decorations
Xtremes Airheads sour berry candies (12 to a package, I found mine at the Dollar Tree and Walgreens)
*(You will want to let the Airheads dry out a little bit in order to hold the rainbow shape, so take them out of the package and cut them the day before you assemble the cupcakes)*
Chocolate coins

Frosting
1 batch white buttercream

Mix together the cake as called for on the box. Once it is all mixed together, separate the cake evenly into 6 different bowls (about 3/4 C per bowl) Using a toothpick for the gel coloring, put a dab in the bowl and stir in.

Add food coloring until you reach your desired shade. I went for super bright!

In order to evenly add each color to the cupcake tins, I opted to put each color in a plastic bag to make it easier on myself.

Put about 1-1 1/2 teaspoons of each color in the bottom of the cupcake paper. If you want the cupcake rainbow to be right side up, start backwards with the colors, so purple, blue, green, yellow, orange, then red on top. I shook mine around a little between each color in order to spread it out a bit.  Once all of the colors have been added, bake the cupcakes at 350 for about 18 minutes. Don't those look so neat?!

And the inside rainbow...

On the second day (or after your rainbows have sat out for about a day):
To frost, put aside about 1/4 of the white frosting for the white clouds. Tint the rest sky blue (or leave it all white and air brush the tops blue as I did). Spread a thin layer of the sky frosting on the tops of the cupcakes. Using a medium round tip or a plastic baggie with the end snipped off, pipe a pillow of clouds on two sides of the cupcake.
Place each end of the rainbow into a pile of clouds. Mine weren't quite dry enough, so I propped them up with a toothpick and stuck them in the freezer for an hour. Worked like a charm.
Spread a little frosting 'glue' on the back of a gold coin and lean the frosted side against one of the clouds. Voila! A perfect treat for your little leprechaun.

As always, find us on Facebook at Little Bear's Cupcakery