Welcome to Little Bear's Cupcakery! Here we have a special treat each week and tell you how to make it for yourself!
Don't want to or don't have time to make it yourself? Check out our website, www.LittleBearsCupcakery.weebly.com to order a batch of the best cupcakes, cakes, cookies, and other yummies around.
Make sure to 'like' us on Facebook too!

Thursday, August 2, 2012

Is It a Cupcake, Or a Cake? Both!

I love cupcake cakes. They combine the best of both worlds, like the easy single serve-ability from the cupcakes and a large decorating surface like a sheet cake. You can arrange the cupcakes into a super cute shape (like this golf course cupcake cake) or just as a sheet like I did with this Bronco's cake. All you need is a dozen cupcakes (or more, depending on what you want to arrange or how many you're feeding) of your favorite flavor, a batch of buttercream frosting, and some food coloring! Yay!
Find a board and cover it in foil, or go to WalMart and get yourself one of those cake boards. Before decorating, lay out the cupcakes in the design you want. This is the time to move them around, before they're 'glued' down. Once you have the design down, dab some frosting on the bottom of each cupcake liner and use that to 'glue' the cupcake to the board. Slap a generous amount of frosting on top of the cupcakes and start spreading it smooth. Pipe a border with a large star tip and voila! You have a blank slate for a cupcake cake!
No plates necessary!

For this Bronco's birthday cake I did the above, but before piping on the border I airbrushed the surface a lovely Bronco's blue and hand drew on the Bronco's logo. I outlined the horse in black and filled in with the white and orange. After piping on the celebratory well wishes, the border went on, along with some confetti sprinkles, and bingo! a fabulous cake!

Wednesday, July 11, 2012

Not Just for S'mores Anymore!

Let me just put this out there, I'm a buttercream frosting kind of girl. To me there's nothing better than a big ol' corner piece of cake, other than maybe a corner piece of cake with ice cream! I personally don't like the taste of fondant but I have to admit, it does make a beautiful end product. I mean, what's the point of eating a cake if there's no frosting and you just pull off the fondant?! But, sometimes you just have to use fondant and when that time comes, there's marshmallow fondant. Yep, fondant made out of marshmallows. I swear, it really does taste like marshmallows (but it does still have the same texture as other fondants for those of you with texture issues). While it tastes way better than regular fondant, it melts a little bit more easily so it's not quite as versatile but great for indoor parties!

Fondant TP roll 1st anniversary cake

Marshmallow Fondant
8 oz mini marshmallows (if you plan on coloring the fondant, get similar colored marshmallows)
1 lb (4 C) powdered sugar, plus extra for dusting
2 T water
Flavors/extracts/colors (vanilla, lemon, chocolate, peanut butter, etc)

In a large microwave safe bowl melt the marshmallows for about 1 minute. Stir with a silicone spatula until all the little 'mallows are melted. Add the flavors/extracts/colors at this point if you are only making one color or flavor for this batch, otherwise add those after the powdered sugar.

Add the powdered sugar 1 C at a time and carefully stir it in. Continue to add sugar until it won't take anymore. Scrape the mixture out on to a work surface that has been very much covered/dusted with powdered sugar. Dust your hands with sugar too, and start kneading that sticky mess of marshmallows with the rest of the sugar that wouldn't stir in. Continue to knead until the fondant is smooth, elastic, and not super sticky. Too much sugar here will make the fondant stiff and difficult to work with.

*If you are making multiple batches of flavors/colors, split up the fondant and shape each one into a disk. You'll knead the flavors and colors in with your hands so gloves would be a great idea at this point. Add the extracts/colors to the center of the disk and fold the fondant in on itself. Knead the fondant until the colors are completely incorporated and no longer streaky.

To use right away roll it out on a powdered sugar covered surface. To store for later wrap tightly with plastic cling wrap and keep in the fridge. You'll need to microwave it for 10-15 seconds and knead it a bit before rolling it out after you take it out of the fridge.

Once it's rolled out, roll it on to the rolling pin and unroll over your cake that has been crumb coated (and the crumb coat should have 'crusted' by now). Smooth the fondant on with your hands starting from the top down smoothing out any pleats and wrinkles as you go and pressing it lightly into the cake. Cut the extra off of the bottom (I use a sharp pizza wheel cutter). Get out your plastic fondant smoother and go back over the fondant to take out any leftover fingerprints and wrinkles. Cut off any excess fondant. I stick mine in the fridge at this point to firm the crumb coat and make sure it sticks to the fondant.

At this point you cant decorate the rest with buttercream (YUM) or other fondant decorations. There are tons of little tools to make flowers and molds to make borders that will make your cake stand out!

Friday, July 6, 2012

Fresh and Sweet

Summer is the perfect time to bake with fresh fruit. I made a delicious fresh strawberry pie for the 4th of July along with some cookies, of course. Now, if only I could have one of you send me some of the fresh berries from Mary's Berries I think that's the only way this pie could be any better!
This recipe is a three part-er, the crust, the 'filling', and the glaze.

Doesn't that look pretty-ful?


One Crust Pie Pastry
2/3 C shortening
1/4 C butter (cold, cut into pats)
1/2 t salt
2 1/2 C Flour
1/4-1/3 C ice cold water

In a mixer, sift in the flour, add the salt, add the shortening and turn on to low. Add the butter one cold pat at a time (make sure it's cold! Have I said that enough?!) Once the dough looks like a crumbly mess add the water 1 Tablespoon at a time. You'll have enough water when you can reach in and squeeze the dough and it holds together but isn't sticky. Roll the dough into a ball, wrap in plastic wrap and refrigerate for at least 1 hour. Before rolling out, let it come to room temp for about 15 minutes. I like to roll mine out on a silpat mat, but any floured surface will do. When you roll it out, aim for about 1/4 inch thick. To get it into the pan easier, roll the dough onto your rolling pin, and unroll into your floured pie pan. Fix the edges how you like them, I like to roll the tops in and seal with a fork. Now, put it back in the fridge for 30 minutes. Super important here before you blind bake a pie crust (that's baking without filling). Preheat the oven to 350, prick the bottom of the dough with a fork to let out the steam, cover the edges with foil and bake for 8 minutes. Take the foil off and bake for another 12. Let the crust cool completely.

Strawberry Pie 'Filling'
8 C washed, hulled, and sliced in half berries
1/2 C Nutella or sweetened cream cheese

On the cooled pie crust, spread the Nutella or cream cheese over the bottom. Arrange the strawberries in a pretty circle. Refrigerate. Done.

Strawberry Pie Glaze
1 1/2 C strawberries, washed and hulled (these can be the ugly ones that weren't good enough to go in the pie)
1/2 C water
1/2 C sugar
2 T cornstarch

In a blender combine the berries and water. On the stove stir together the sugar and cornstarch, pour in the water/berries mix. Heat on medium until bubbly (not boiling) and thick. Remove from heat for 10 minutes and do NOT stir while it's cooling. Feel free to stir while it's cooking though.
Just before serving pour or brush the glaze over the pie. Do not do this more than 3 hours before serving or you'll have a mushy mess. And if you have left over glaze it's basically strawberry jelly. YUM! Super delicious on toast.

Wednesday, June 27, 2012

Time to Cool Down

Better than ice cream? Not really, but it's a great substitute when you've already had your ice cream allowance for the week (Nobody else gets that? Must just be me then...). I first saw frozen hot chocolate on Food Network when they went to Serendipity 3 in New York. Since then I've tried it at DQ, but at $4 a pop, I knew I could make it myself for cheaper so I went on a frozen hot chocolate spree trying to make a copycat recipe. I made a recipe, with help from Big Bear's momma's hot cocoa recipe, that I think is pretty darn close. The best part of this is that you can keep the cocoa mix year round, have frozen in the summer and hot in the winter. Or however you want to do it, I'm not telling you how to drink your cocoa.
Mmmmm chocolate-y

Frozen Hot Chocolate (Makes one drink)
6 T cocoa mix (recipe below)
1 C ice
1 C milk
Whipped Cream
Cherry
Chocolate chips or shavings

In a blender (one that can crush ice), mix the milk and cocoa mix until well combined. Add ice and blend until crushed, it should be the consistency of a frozen margarita or a slushy. Pour into a a large cup, top with whipped cream, a cherry, and chocolate chips or shavings. Drive past the DQ and laugh at everyone in line waiting to get their frozen hot chocolate. (Last part is optional!)

Cocoa Mix
2 C powdered sugar
1 C cocoa (I like Hershey's Dark)
2 1/2 C dry creamer
1 t salt

In a mixing bowl combine all the ingredients and store in an airtight container.


Pictures are coming once Big Bear gets home and gets his FroCho!

Wednesday, June 20, 2012

Cinnamon Roll Deliciousness

Mmmmm, what's better than a plate full of warm cinnamon rolls in the morning? Probably waking up to the smell of warm cinnamon rolls :D But since I'm the little bakeress in this house my hubs gets to experience that one. The best thing about this recipe though is that you can freeze the rolls before letting them rise and pull out 1-2 whenever you want a couple! Yay for not having to do the whole batch at once!
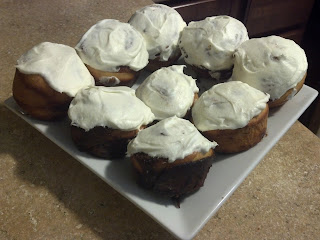
I chose to do them in the muffin pan, individual servings!

Cinnamon Rolls
Dough
3/4 C buttermilk, warm (110 degrees)
6 T unsalted butter, melted and cooled
3 eggs
4 1/4 C all-purpose flour, reserve 1/4 C
1/4 C sugar
1 envelope instant or rapid-rise yeast

1 1/4 t salt
Filling 
3/4 C packed light brown sugar
1/4 C ground cinnamon
Pinch of salt
1 T unsalted butter, melted and cooled

Frosting
1 C softened butter
10 oz softened cream cheese
2 oz vegetable shortening
1 1/2 lbs powdered sugar
2 T heavy cream
2 t vanilla
1 T meringue powder


For the dough:
Whisk the buttermilk, melted butter, and eggs together in a large separate bowl. Combine 4 cups of the flour, sugar, yeast, and salt together in a mixer with the dough hook. With the mixer on low speed, add the buttermilk mixture and mix about 2 minutes. Increase the mixer speed to medium and knead until the dough is smooth and elastic, about 10 minutes. If after 5 minutes more flour is needed, add the remaining 1/4 cup flour, 1 tablespoon at a time, until the dough clears the side of the bowl but sticks to the bottom.
Turn the dough out onto a lightly oiled counter (I use cooking spray, easy!) with plenty of room and knead by hand to form a smooth, round ball. Place the dough in a lightly oiled bowl and wrap tightly with plastic wrap. Let rise in a warm place until doubled in size, 2 to 2 1/2 hours.

For the filling:
Grease a 9 x 13 pan or a jumbo muffin pan if you are doing just a few. Mix the brown sugar, cinnamon, and salt together in a small bowl. Turn the risen dough out onto a lightly floured counter and press/roll it into a 16 by 12-inch rectangle. Brush the dough with the melted butter, then sprinkle the brown sugar mixture over it, leaving a  1 inch border along the top edge. Press on the filling to ctick it to the dough.
Loosen the dough from the counter using a bench scraper, metal spatula, or any other instrument with a large flat edge, and roll the dough into a tight log. Pinch the seam closed and roll the log seam side down. Gently stretch the log to 18 inches in length with an even diameter and pat the ends to even them.
Slice the log into 12 evenly sized rolls (about 1 1/2 inches wide) using a serrated knife. Arrange the rolls in the prepared baking pan and wrap tightly with greased plastic wrap, or place a few in the oiled muffin pan and cover. If you want to freeze them, stop at this point and don't let them rise! Freeze them in whatever pan they're in, covered in heavy duty foil. Otherwise, let rise in a warm place until the rolls have nearly doubled in size and are pressed against one another, 1 to 1 1/2 hours. Adjust an oven rack to the middle and heat the oven to 350. Bake the rolls until golden and puffed, 25 to 30 minutes if you are using the 9 x 13 pan. Bake 20 to 25 minutes if using the muffin pan. Flip the rolls out onto a wire rack set over a sheet of parchment paper (for easy cleanup) and let cool for 5 minutes.

For the frosting:
In a mixer combine the butter, cream cheese, and shortening. Add the powdered sugar slowly, 1 cup at a time. Once the sugar is fully incorporated, add the vanilla, meringue powder, and cream. Beat on high for about 3 minutes. Stop, scrape down the sides and beat for an additional 2 minutes. This will make about 2 1/2 times the amount of frosting for one batch of 12 rolls. The frosting will keep about 2 weeks in the fridge and 2 months in the freezer.

Once the rolls are mostly cool, but still warm enough to slightly melt the frosting, spread the frosting over the rolls and delight anybody lucky enough to be waking up in your house that day.

"I wish they made a cinnamon roll incense because I don't always have time to make a pan. Perhaps I'd rather light a stick and then have my roommates wake up with false hopes" -Mitch Hedberg