Welcome to Little Bear's Cupcakery! Here we have a special treat each week and tell you how to make it for yourself!
Don't want to or don't have time to make it yourself? Check out our website, www.LittleBearsCupcakery.weebly.com to order a batch of the best cupcakes, cakes, cookies, and other yummies around.
Make sure to 'like' us on Facebook too!

Wednesday, February 29, 2012

...'Cause They're Oh So Easy

I have fallen in love. Again. This time with a delicious baked treat. I would make this every single week if I didn't care about eating the whole pan by myself, every single week. And you know what? I would never get bored of this because there are so many different possible combinations. What is this treat, you ask? I call it 3-Way Brownies. (There's a much more R-rated name to it too, but since this is a PG blog, I'll keep that name to  myself). The part I love best about these brownies is that they're quick and easy (a hint at the R-rated name *wink*wink*) Don't believe me? Check out the ingredients:

Base
1 roll pre-made chocolate chip cookie dough (get the big one)

Middle
1 package cream filled chocolate cookies (I used Oreos)

Top
1 9x13 family size brownie mix (and the eggs/oil/water called for in the mix)

See? Told you it was easy. Perfect for those last minute bake sales and pot lucks that your loved ones swore they told you about a month ago.
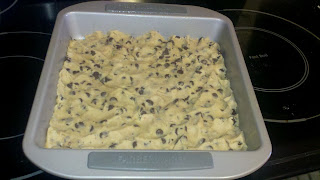
Cookie Base (I know it's an 8x8 pan)
Go ahead and pre-heat the oven to 350. Grab a 9x13 baking pan and spray it down with non-stick spray (yes, even if it's a non-stick pan). Cut open the cookie dough roll. Gosh, see how easy this is?! Smoosh the cookie dough into the pan, making sure you get it to all the corners. Its going to be a little thin and nearly impossible to get perfectly flat, that's ok.
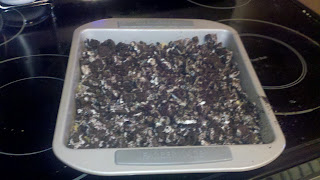
Crushed cookie layer (still an 8x8 pan, yes)
Next, rip open the package of cookies. At this point you can either A.) place the cookies in whole, just in rows, or B.) crush them up and spread them over the cookie dough. I've tried both, they're equally as delicious. The crushed cookies take an extra step though. I find using a plastic gallon sized zip top bag and a rolling pin is probably the easiest way to crush cookies. Gets the most stress out, too.
And the brownie layer. Mmmm...chocolate
In a separate bowl mix up the brownie mix with whatever eggs/oil/water it calls for. (You grabbed the 9x13 family size box, right?) Pour the brownie mix over the chocolate cookies. Hey, look at that! It's ready for the oven!
Bake for 35-40 minutes. I know, it sounds like an un-godly amount of time in the oven, but you're really baking three treats at once. Before you pull it out, do the toothpick test. If the brownie batter is still gooey, pop it back in for another 5 minutes.

Normally at this point I would caution you to wait until everything is cooled. Not this time. Before anyone else knows that the 3-Way Brownies are done, grab your fork and dig in! If you have a little more self-restraint and DO actually let them cool, heat them up a little in the microwave before eating. They're heavenly when they're warm. Add some vanilla ice cream or a glass of milk and they're down right sinful.

*Variations
~Use a homemade cookie dough/brownie mix
~Try different flavor combinations, like chocolate cookie dough and crushed peanut butter sandwich cookies
~Use blondie brownies on top

*Disclaimer* I am not at fault for any resulting addictions from this recipe

Make sure to check us out on Facebook!  Little Bear's Cupcakery on Facebook

Wednesday, February 22, 2012

And I Shall Call Him.....Mini Me

I love all things mini when it comes to food. They're just so cute, you can't help but go "awwwww". But why are we limited to making mini frosted cakes in the form of cupcakes? Why not other types of cake? How about.......a mini Pineapple Upside Down Cake? I think YES!

Sauce
2/3 C packed brown sugar
1/2 C butter
1 t vanilla extract


Cake
1 box yellow cake mix
2 eggs
1/3 C vegetable oil
1 t caramel extract


Topping
1 can Maraschino cherries
2 cans sliced pineapple rings


Preheat oven to 350.
Mmmmm, cherries
Drain the cans of pineapple and reserve 1 C of the liquid. Drain the cherries, throw that juice out. (Be careful, those cherries will stain EVERYTHING!)
On the stove top in a small saucepan melt the butter with the brown sugar over low heat. Once they are melted together, remove from heat and stir in the vanilla. Let cool slightly. In a large bowl, combine the cake mix, eggs, vegetable oil, and caramel. Add the 1 C of pineapple liquid.
Evenly divide the butter/sugar sauce into each opening. This comes out to be about 1 T or so per opening.
Place one pineapple ring in each opening of a muffin pan (if using a standard size muffin pan, the rings won't lay flat, they will curve up a bit, or you can trim them so they do lay flat). Place a cherry inside each opening of a pineapple ring. 
Fill the openings about 2/3 full with the cake mix.  Bake for about 22-25 minutes.
Make sure there's a baking sheet under those cakes!

When the cakes are done (the toothpick test!), pull them out of the oven and immediately invert the pan onto a cooling rack that is over another baking sheet. This will allow the cakes to drain off any excess liquid, and will make cleaning up that excess liquid so much easier. In short, DO NOT just invert them onto a baking sheet (as you see here). This will result in Pineapple Upside Down Goo. Not yummy cake.

These little cakes are so yummy and a perfect change from a frosted cupcake. Plus, there's fruit! So that counts as fruit for breakfast, right mom?!


Wednesday, February 15, 2012

I Like...Pie

I mean, who honestly doesn't like pie? With all of the different choices you could have (fruit, chocolate, cream) it's a wonder that anyone could dislike pie. But what if your family can't agree on a flavor? The answer....mini pies!!! A personal mini pie in a flavor for everyone! This week I made chocolate mini pies for my sweetie for Valentine's Day, and they were wonderful. Even better? They were super easy, only three ingredients.

Chocolate Mini Pie

1 box refrigerated prepared pie dough (not the already cooked kind)
1 can sweetened condensed milk
1 bag chocolate chips

TaDah! Sounds pretty easy, huh? I made both a single crust and double crust chocolate pie. The single crust used a silicone heart mold like this one from Wilton. The double crust using a mini pie/tart mold similar to this one on Amazon.com.
Ok, to make these easy pies, take the pie dough out of the fridge, unroll it and let it come to room temperature. Pie dough that comes to room temp will shrink less in the oven than cold dough. Preheat the oven to 450. While the dough and oven are warming up, go ahead and set up a double boiler. Once the water is simmering (not boiling) pour in the chocolate chips and the condensed milk. Slowly melt and combine the chocolate and milk, stirring occasionally, do not boil.
When the dough is no longer cold, start cutting dough to put in the molds. The double mold has a handy cutter that will get the exact size. For the heart molds I cut a large triangle and carefully filled the mold, pinching and cutting off the excess.


Single crust heart mini pie
Single Crust directions:
Bake the single crust pie for about 10-12 minutes, or until a nice golden brown. When you pull them out of the oven, go ahead and fill the pie crusts while they are still in the mold. Refrigerate before removing the mold.


Double Crust directions:
Double crust mini pie
Place the cut dough in the shaper and fill the bottom with about two spoonfulls of the chocolate mixture. Press down on the tops to seal the two crusts. Use your fingers to ensure a good seal, don't want that chocolate leaking out! Place on a cookie sheet and bake for about 24-26 minutes, or until golden brown.

Pop them in the microwave for about 30 seconds right before serving and hand them out with a big glass of milk. YUM!

Wednesday, February 8, 2012

I Swear I Only Watch for the Commercials

I was a little disappointed by the match up for the big game this year, so I focused on making something delicious instead. I made a few revisions to the chocolate buttercream used for the frosting, and I think it's the best one yet!

Football Cupcake Cake

You will need:
1 box cake mix, any flavor, and any ingredients called for on the box

Chocolate Buttercream
1/2 C butter
1 stick shortening
3 C powdered sugar
2 t chocolate extract
32 oz melted chocolate chips (2 small bags)
1/4 C milk

Make and bake the cupcakes according to instructions. The size of football that I made used 23 cupcakes. Yay! That means there's an extra one for "quality assurance" testing. While the cupcakes are cooling, mix up the best ever, new and improved chocolate buttercream by creaming together the butter and shortening. Slowly add the powdered sugar. At this point, take out about 1 cup of frosting and put it to the side. You'll need this frosting white for the seams and decorations on the ball. In the larger bowl, pour in the slightly cooled (as in, not straight from the stove top) melted chocolate chips. Mix in the chocolate extract. Start with 1/4 C of milk and add until you reach the desired consistency. Also add milk to the reserved frosting that you put to the side until you reach your desired consistency.

To decorate, arrange the unfrosted cupcakes in the general shape of a football first. This is the time to play and move them around until you're happy with the shape. Once you've achieved this, take a knife or spreader and smoosh a little frosting on the bottom of each cupcake to "glue" it into place. This way the cupcakes won't move around which is great if you're going to need to transport it. Now that the cupcakes aren't going anywhere, pipe a healthy (or unhealthy, if you prefer) amount of the chocolate frosting on top of each cupcake using a large circle tip. The more frosting, the better because it's easier to take away from what's there than to evenly add more on. Once all the cupcakes are piped on, use a knife or spreader, or an offset spatula if you have one, to smooth and level out the frosting. Fill another piping bag (or zip-top baggie) with the reserved white frosting. Pipe a thick band across each end of the football as well as a seam across the middle. Add in any well wishes or wording you would like around the seams.

Voila! A football that everyone would rather eat than throw!

Go Pack Go!

I know, I know, the Packers weren't in the Super Bowl this year. That's why the treats I made for Super Bowl Sunday were distinctly generic. But, with a few easy tweaks these goodies could easily showcase your love for your favorite team for the big game!

Chocolate Covered Strawberry Footballs

You will need:
1 bag chocolate candy wafer melts
1 bag white chocolate candy wafer melts
A bunch of strawberries (I used one small box)

First melt the chocolate wafers over a double boiler or in the microwave. Using regular chocolate chips here isn't preferred, they don't set up as quickly or as nicely as the candy melts. I tend to prefer the double boiler melting method, mostly because I don't have to take it out of the microwave and stir every thirty seconds. While the chocolate is melting give the strawberries a quick rinse and look over and gently pat them dry.
Make sure you have a deep container for the chocolate. This makes dipping the strawberries much easier. Once you have smooth, melted chocolate, go ahead and start dipping. While you're dipping, you can start melting the white chocolate candy wafers. In order to get a look that was nice and even on all sides I held the strawberries over the chocolate until the candy had hardened (only about 30 seconds). Once you have all of your strawberries coated in chocolate, go ahead and put the chocolate in a sealed container in the pantry, you're all done with it.
Once you're done with the chocolate, and your white chocolate is melted, spoon about 1 cup (or about 3/4 of a disposable pastry bag) of the melted white chocolate into a pastry bag. I chose to use a disposable pastry bag and just snipped the end off, no special tips needed! You can even use a re-sealable plastic baggie for this part if you don't have pastry bags. The white decorations were a little more tricky for me and definitely took a few tries to get it right. I found that if you hold the strawberry by the green leafy end and have the small pointed end pointed up towards you, it's much easier to simply move the bag around the tip instead of moving the berry. Again, hold the berry until the decorations have hardened, about 30 seconds. I went ahead and did all of the pointed end circles, then all of the seams, then all of the large end circle, but it's up to you if you want to decorate the whole berry at once.

Storage Tips:
Do not store these in the fridge!!! They will get water droplets on the outside of the chocolate, and will make the berries go mushy faster inside the chocolate. That being said, these are best to be prepared no more than 1-2 days in advance and kept on the counter...if you can keep from eating them for that long before the big game!

Wednesday, February 1, 2012

Love Is In the Air

Looking for a chocolatey dessert for Valentine's Day? Look no further! This week we are having a chocolate cupcake with chocolate chip and cream cheese filling, and chocolate buttercream. Because who doesn't want a chocolate overload on the most chocolate centered holiday of the year?

Cupcakes:
1 box chocolate cake mix

Chocolate chip cream cheese filled cupcakes!
Filling:
16 oz softened cream cheese (or Neufchatel cheese if you want to save the calories)
2 C powdered sugar
1 C mini chocolate chips

Frosting:
1/2 C butter
1/2 C shortening
6 C powdered sugar
16 oz melted chocolate chips
1 T chocolate extract

Once the cupcakes are cooled, use the handle end of a wooden spoon to make an indentation into each cupcake. (You don't want to go all the way to the cupcake liner, but have a big enough hole for a good amount of filling). Pipe the filling into the cupcakes using a large piping tip (so the chocolate chips don't get stuck), or gently spoon it in. Once the cupcakes are filled, frost the cupcakes. If you use a large star tip you can make a swirl pattern by starting at the outside and working up and in, or, you can make a rose by starting on the inside and working out to the edges (but not up).

There you go! A super easy, quick and delicious Valentine's dessert. Because we all know you'd rather not spend the whole night in the kitchen ;)